Meteor範本使用三個頂級標籤。前兩個是 head 和 body 標籤。這些標籤和在普通的HTML中做的工作一樣。第三個標籤 template。這是我們將HTML連接到JavaScript的地方。
簡單的範本
下麵的例子顯示了這一過程。我們使用 name = "myParagraph"屬性創建一個範本。我們的 template 標籤body元素下方創建,但需要包括它在螢幕渲染顯示之前。我們也可以使用 {{> myParagraph}} 語法. 在範本中我們使用的是雙大括弧 ({{text}}). 這就是所謂的 meteor 範本Spacebars 語言。
在 JavaScript檔我們設置 Template.myParagraph.helpers({}) 方法是對範本連接。我們只在本示例中使用 text 助手。
meteorApp/client/import/ui/first-tpl.html
<head>
   <title>meteorApp</title>
</head>

<body>
   <h1>Header</h1>
   {{> myParagraph}}
</body>

<template name = "myParagraph">
   <p>{{text}}</p>
</template>
在 JavaScript檔我們設置 Template.myParagraph.helpers({}) 方法是對範本連接。我們只在本示例中使用 text 助手。
meteorApp/client/main.js
import { Template } from 'meteor/templating';
Template.myParagraph.helpers({
  text: 'This is paragraph...'
});
我們保存更改之後,打開流覽器會得到下麵的輸出 -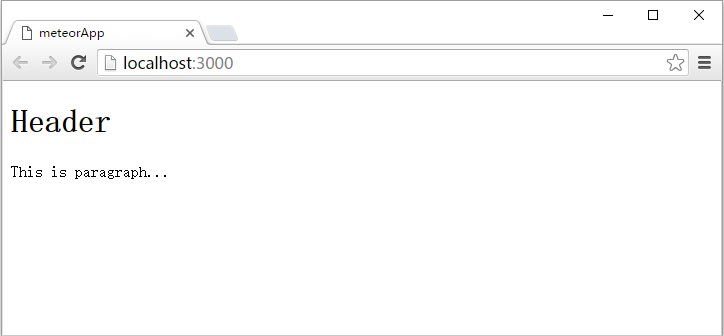
塊範本
在這個例子中,我們使用的是 {{#each paragraphs}} 遍歷數組 paragraphs,並返回範本 name = "paragraph" 遍曆每個值 。
meteorApp/client/import/ui/first-tpl.html
<head>
   <title>meteorApp</title>
</head>

<body>
   <div>
      {{#each paragraphs}}
         {{> paragraph}}
      {{/each}}
   </div>
</body>

<template name = "paragraph">
   <p>{{text}}</p>
</template>
這裏我們需要創建 paragraphs 助手. 這是有五個文本值的數組。
meteorApp/client/main.js
// This code only runs on the client
import { Template } from 'meteor/templating';
Template.body.helpers({
  paragraphs: [
     { text: "This is paragraph 1..." },
     { text: "This is paragraph 2..." },
     { text: "This is paragraph 3..." },
     { text: "This is paragraph 4..." },
     { text: "This is paragraph 5..." }
  ]
});
現在我們可以在螢幕上看到五個段落。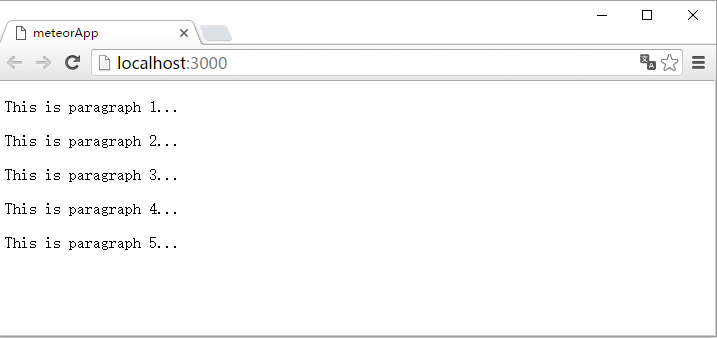
上一篇:
Meteor第一個應用程式
下一篇:
Meteor集合