Secure Spring REST API使用基本身份驗證這篇文章中演示了如何使用Spring Security基本身份驗證細節。 這個應用程式將作為這個例子的後端。雖然我們只在這裏接觸到一些主要概念,對於後端完整的代碼不會在這裏再重複。所以您可以自行下載,安裝並在本地啟動,以便測試這個AngularJS應用程式。
什麼是基本身份驗證?
如基於Web的客戶端的登錄頁面或會話身份驗證的傳統方法與人類有良好的互動效果,但並不能完全適合很好地應用,[REST]客戶端它不止只一個Web應用程式進行通信時。考慮它是一個完全不同於伺服器上的其他API,它隨時都會與伺服器的API通信,無需任何人為干預。
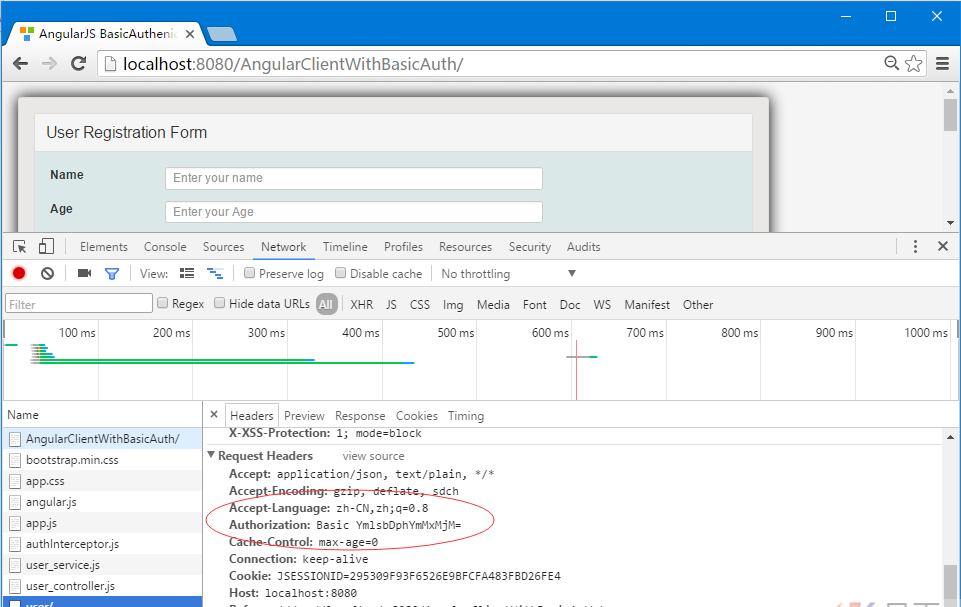
基本身份驗證它提供了一個方法來解決這個問題,雖然不是很安全。基本身份驗證,客戶端的每個請求發送Base64編碼憑據,使用HTTP[授權]頭。這意味著每個請求獨立於其他請求和服務器可能/不維護客戶端,這對可擴展性是非常好的。
前端部分
1.每個請求使用AngularJS發送Authorization頭
authInterceptor.js
angular.module('myApp')
.factory('AuthInterceptor', [function() {
    return {
	// Send the Authorization header with each request
        'request': function(config) {
			config.headers = config.headers || {};
			var encodedString = btoa("bill:abc123");
			config.headers.Authorization = 'Basic '+encodedString;
           return config;
        }
    };
}]);
2. 應用程式
app.js
'use strict';

var App = angular.module('myApp',[]);

App.config(['$httpProvider', function($httpProvider) {
  $httpProvider.interceptors.push('AuthInterceptor');
}]);
3. 服務與伺服器上的REST API通信
UserService.js
'use strict';

angular.module('myApp').factory('UserService', ['$http', '$q', function($http, $q){

    var REST_SERVICE_URI = 'http://localhost:8080/SecureRESTApiWithBasicAuthentication/user/';

    var factory = {
        fetchAllUsers: fetchAllUsers,
        createUser: createUser,
        updateUser:updateUser,
        deleteUser:deleteUser
    };

    return factory;

    function fetchAllUsers() {
        var deferred = $q.defer();
        $http.get(REST_SERVICE_URI)
            .then(
            function (response) {
                deferred.resolve(response.data);
            },
            function(errResponse){
                console.error('Error while fetching Users');
                deferred.reject(errResponse);
            }
        );
        return deferred.promise;
    }

    function createUser(user) {
        var deferred = $q.defer();
        $http.post(REST_SERVICE_URI, user)
            .then(
            function (response) {
                deferred.resolve(response.data);
            },
            function(errResponse){
                console.error('Error while creating User');
                deferred.reject(errResponse);
            }
        );
        return deferred.promise;
    }


    function updateUser(user, id) {
        var deferred = $q.defer();
        $http.put(REST_SERVICE_URI+id, user)
            .then(
            function (response) {
                deferred.resolve(response.data);
            },
            function(errResponse){
                console.error('Error while updating User');
                deferred.reject(errResponse);
            }
        );
        return deferred.promise;
    }

    function deleteUser(id) {
        var deferred = $q.defer();
        $http.delete(REST_SERVICE_URI+id)
            .then(
            function (response) {
                deferred.resolve(response.data);
            },
            function(errResponse){
                console.error('Error while deleting User');
                deferred.reject(errResponse);
            }
        );
        return deferred.promise;
    }

}]);
4. 控制器
user_controller.js
'use strict';

angular.module('myApp').controller('UserController', ['$scope', 'UserService', function($scope, UserService) {
    var self = this;
    self.user={id:null,username:'',address:'',email:''};
    self.users=[];

    self.submit = submit;
    self.edit = edit;
    self.remove = remove;
    self.reset = reset;


    fetchAllUsers();

    function fetchAllUsers(){
        UserService.fetchAllUsers()
            .then(
            function(d) {
                self.users = d;
            },
            function(errResponse){
                console.error('Error while fetching Users');
            }
        );
    }

    function createUser(user){
        UserService.createUser(user)
            .then(
            fetchAllUsers,
            function(errResponse){
                console.error('Error while creating User');
            }
        );
    }

    function updateUser(user, id){
        UserService.updateUser(user, id)
            .then(
            fetchAllUsers,
            function(errResponse){
                console.error('Error while updating User');
            }
        );
    }

    function deleteUser(id){
        UserService.deleteUser(id)
            .then(
            fetchAllUsers,
            function(errResponse){
                console.error('Error while deleting User');
            }
        );
    }

    function submit() {
        if(self.user.id===null){
            console.log('Saving New User', self.user);
            createUser(self.user);
        }else{
            updateUser(self.user, self.user.id);
            console.log('User updated with id ', self.user.id);
        }
        reset();
    }

    function edit(id){
        console.log('id to be edited', id);
        for(var i = 0; i < self.users.length; i++){
            if(self.users[i].id === id) {
                self.user = angular.copy(self.users[i]);
                break;
            }
        }
    }

    function remove(id){
        console.log('id to be deleted', id);
        if(self.user.id === id) {//clean form if the user to be deleted is shown there.
            reset();
        }
        deleteUser(id);
    }


    function reset(){
        self.user={id:null,username:'',address:'',email:''};
        $scope.myForm.$setPristine(); //reset Form
    }

}]);
5. 視圖
index.html
<html>
  <head>
    <title>Form Demo</title>
    <style>
      .username.ng-valid {
          background-color: lightgreen;
      }
      .username.ng-dirty.ng-invalid-required {
          background-color: red;
      }
      .username.ng-dirty.ng-invalid-minlength {
          background-color: yellow;
      }

      .email.ng-valid {
          background-color: lightgreen;
      }
      .email.ng-dirty.ng-invalid-required {
          background-color: red;
      }
      .email.ng-dirty.ng-invalid-email {
          background-color: yellow;
      }

    </style>
     <link rel="stylesheet" href="https://maxcdn.bootstrapcdn.com/bootstrap/3.3.5/css/bootstrap.min.css">
     <link rel="stylesheet" href="./css/app.css">
  </head>
  <body ng-app="myApp">
      <div class="generic-container" ng-controller="UserController as ctrl">
          <div class="panel panel-default">
              <div class="panel-heading"><span class="lead">User Registration Form </span></div>
              <div class="formcontainer">
                  <form ng-submit="ctrl.submit()" name="myForm" class="form-horizontal">
                      <input type="hidden" ng-model="ctrl.user.id" />
                      <div class="row">
                          <div class="form-group col-md-12">
                              <label class="col-md-2 control-lable" for="uname">Name</label>
                              <div class="col-md-7">
                                  <input type="text" ng-model="ctrl.user.name" id="uname" class="username form-control input-sm" placeholder="Enter your name" required ng-minlength="3"/>
                                  <div class="has-error" ng-show="myForm.$dirty">
                                      <span ng-show="myForm.uname.$error.required">This is a required field</span>
                                      <span ng-show="myForm.uname.$error.minlength">Minimum length required is 3</span>
                                      <span ng-show="myForm.uname.$invalid">This field is invalid </span>
                                  </div>
                              </div>
                          </div>
                      </div>


                      <div class="row">
                          <div class="form-group col-md-12">
                              <label class="col-md-2 control-lable" for="age">Age</label>
                              <div class="col-md-7">
                                  <input type="number" ng-model="ctrl.user.age" id="age" class="form-control input-sm" placeholder="Enter your Age"/>
                              </div>
                          </div>
                      </div>

                      <div class="row">
                          <div class="form-group col-md-12">
                              <label class="col-md-2 control-lable" for="salary">Salary</label>
                              <div class="col-md-7">
                                  <input type="number" ng-model="ctrl.user.salary" id="salary" class="form-control input-sm" placeholder="Enter your Salary" ng-pattern="/^[0-9]+(\.[0-9]{1,2})?$/" step="0.01" required/>
                                  <div class="has-error" ng-show="myForm.$dirty">
                                      <span ng-show="myForm.salary.$error.required">This is a required field</span>
                                      <span ng-show="myForm.salary.$invalid">This field is invalid </span>
                                  </div>
                              </div>
                          </div>
                      </div>

                      <div class="row">
                          <div class="form-actions floatRight">
                              <input type="submit"  value="{{!ctrl.user.id ? 'Add' : 'Update'}}" class="btn btn-primary btn-sm" ng-disabled="myForm.$invalid">
                              <button type="button" ng-click="ctrl.reset()" class="btn btn-warning btn-sm" ng-disabled="myForm.$pristine">Reset Form</button>
                          </div>
                      </div>
                  </form>
              </div>
          </div>
          <div class="panel panel-default">
                <!-- Default panel contents -->
              <div class="panel-heading"><span class="lead">List of Users </span></div>
              <div class="tablecontainer">
                  <table class="table table-hover">
                      <thead>
                          <tr>
                              <th>ID.</th>
                              <th>Name</th>
                              <th>Age</th>
                              <th>Salary</th>
                              <th width="100">
                          </tr>
                      </thead>
                      <tbody>
                          <tr ng-repeat="u in ctrl.users">
                              <td><span ng-bind="u.id"></span></td>
                              <td><span ng-bind="u.name"></span></td>
                              <td><span ng-bind="u.age"></span></td>
                              <td><span ng-bind="u.salary"></span></td>
                              <td>
                              <button type="button" ng-click="ctrl.edit(u.id)" class="btn btn-success custom-width">Edit</button>  <button type="button" ng-click="ctrl.remove(u.id)" class="btn btn-danger custom-width">Remove</button>
                          </tr>
                      </tbody>
                  </table>
              </div>
          </div>
      </div>
      <script src="https://ajax.googleapis.com/ajax/libs/angularjs/1.4.4/angular.js"></script>
      <script src="./js/app.js"></script>
      <script src="./js/authInterceptor.js"></script>
      <script src="./js/user_service.js"></script>
      <script src="./js/user_controller.js"></script>
  </body>
</html>
後端程式
1. REST API
package com.zaixian.springmvc.controller;

import java.util.List;

import org.springframework.beans.factory.annotation.Autowired;
import org.springframework.http.HttpHeaders;
import org.springframework.http.HttpStatus;
import org.springframework.http.MediaType;
import org.springframework.http.ResponseEntity;
import org.springframework.web.bind.annotation.PathVariable;
import org.springframework.web.bind.annotation.RequestBody;
import org.springframework.web.bind.annotation.RequestMapping;
import org.springframework.web.bind.annotation.RequestMethod;
import org.springframework.web.bind.annotation.RestController;
import org.springframework.web.util.UriComponentsBuilder;

import com.zaixian.springmvc.model.User;
import com.zaixian.springmvc.service.UserService;

@RestController
public class HelloWorldRestController {

    @Autowired
    UserService userService;  //Service which will do all data retrieval/manipulation work


    //-------------------Retrieve All Users--------------------------------------------------------

    @RequestMapping(value = "/user/", method = RequestMethod.GET)
    public ResponseEntity<List<User>> listAllUsers() {
        List<User> users = userService.findAllUsers();
        if(users.isEmpty()){
            return new ResponseEntity<List<User>>(HttpStatus.NO_CONTENT);//You many decide to return HttpStatus.NOT_FOUND
        }
        return new ResponseEntity<List<User>>(users, HttpStatus.OK);
    }


    //-------------------Retrieve Single User--------------------------------------------------------

    @RequestMapping(value = "/user/{id}", method = RequestMethod.GET, produces = {MediaType.APPLICATION_JSON_VALUE,MediaType.APPLICATION_XML_VALUE})
    public ResponseEntity<User> getUser(@PathVariable("id") long id) {
        System.out.println("Fetching User with id " + id);
        User user = userService.findById(id);
        if (user == null) {
            System.out.println("User with id " + id + " not found");
            return new ResponseEntity<User>(HttpStatus.NOT_FOUND);
        }
        return new ResponseEntity<User>(user, HttpStatus.OK);
    }


    //-------------------Create a User--------------------------------------------------------

    @RequestMapping(value = "/user/", method = RequestMethod.POST)
    public ResponseEntity<Void> createUser(@RequestBody User user, UriComponentsBuilder ucBuilder) {
        System.out.println("Creating User " + user.getName());

        if (userService.isUserExist(user)) {
            System.out.println("A User with name " + user.getName() + " already exist");
            return new ResponseEntity<Void>(HttpStatus.CONFLICT);
        }

        userService.saveUser(user);

        HttpHeaders headers = new HttpHeaders();
        headers.setLocation(ucBuilder.path("/user/{id}").buildAndExpand(user.getId()).toUri());
        return new ResponseEntity<Void>(headers, HttpStatus.CREATED);
    }


    //------------------- Update a User --------------------------------------------------------

    @RequestMapping(value = "/user/{id}", method = RequestMethod.PUT)
    public ResponseEntity<User> updateUser(@PathVariable("id") long id, @RequestBody User user) {
        System.out.println("Updating User " + id);

        User currentUser = userService.findById(id);

        if (currentUser==null) {
            System.out.println("User with id " + id + " not found");
            return new ResponseEntity<User>(HttpStatus.NOT_FOUND);
        }

        currentUser.setName(user.getName());
        currentUser.setAge(user.getAge());
        currentUser.setSalary(user.getSalary());

        userService.updateUser(currentUser);
        return new ResponseEntity<User>(currentUser, HttpStatus.OK);
    }

    //------------------- Delete a User --------------------------------------------------------

    @RequestMapping(value = "/user/{id}", method = RequestMethod.DELETE)
    public ResponseEntity<User> deleteUser(@PathVariable("id") long id) {
        System.out.println("Fetching & Deleting User with id " + id);

        User user = userService.findById(id);
        if (user == null) {
            System.out.println("Unable to delete. User with id " + id + " not found");
            return new ResponseEntity<User>(HttpStatus.NOT_FOUND);
        }

        userService.deleteUserById(id);
        return new ResponseEntity<User>(HttpStatus.NO_CONTENT);
    }


    //------------------- Delete All Users --------------------------------------------------------

    @RequestMapping(value = "/user/", method = RequestMethod.DELETE)
    public ResponseEntity<User> deleteAllUsers() {
        System.out.println("Deleting All Users");

        userService.deleteAllUsers();
        return new ResponseEntity<User>(HttpStatus.NO_CONTENT);
    }

}
2.在Spring Security中啟用基本驗證
1. 配置httpBasic : 配置HTTP基本身份驗證。 [基於HTTP的XML]
2. 配置有BasicAuthenticationEntryzaixian認證入口點 : 如果驗證失敗[無效/缺少憑據],這個切入點將被觸發。 這是非常重要的,因為我們不想重定向到身份驗證失敗的登錄頁面[Spring Security的默認行為] ,因為這裏我們沒有一個登錄頁面。
下麵顯示的是基於HTTP和切入點建立完整的 Spring Security 配置。
package com.zaixian.springmvc.security;

import org.springframework.beans.factory.annotation.Autowired;
import org.springframework.context.annotation.Bean;
import org.springframework.context.annotation.Configuration;
import org.springframework.http.HttpMethod;
import org.springframework.security.config.annotation.authentication.builders.AuthenticationManagerBuilder;
import org.springframework.security.config.annotation.web.builders.HttpSecurity;
import org.springframework.security.config.annotation.web.builders.WebSecurity;
import org.springframework.security.config.annotation.web.configuration.EnableWebSecurity;
import org.springframework.security.config.annotation.web.configuration.WebSecurityConfigurerAdapter;
import org.springframework.security.config.http.SessionCreationPolicy;

@Configuration
@EnableWebSecurity
public class SecurityConfiguration extends WebSecurityConfigurerAdapter {

	private static String REALM="MY_TEST_REALM";

	@Autowired
	public void configureGlobalSecurity(AuthenticationManagerBuilder auth) throws Exception {
		auth.inMemoryAuthentication().withUser("bill").password("abc123").roles("ADMIN");
		auth.inMemoryAuthentication().withUser("tom").password("abc123").roles("USER");
	}

	@Override
	protected void configure(HttpSecurity http) throws Exception {

	  http.csrf().disable()
	  	.authorizeRequests()
	  	.antMatchers("/user/**").hasRole("ADMIN")
		.and().httpBasic().realmName(REALM).authenticationEntryzaixian(getBasicAuthEntryzaixian())
		.and().sessionManagement().sessionCreationPolicy(SessionCreationPolicy.STATELESS);//We don't need session.
 	}

	@Bean
	public CustomBasicAuthenticationEntryzaixian getBasicAuthEntryzaixian(){
		return new CustomBasicAuthenticationEntryzaixian();
	}

    /* To allow Pre-flight [OPTIONS] request from browser */
    @Override
    public void configure(WebSecurity web) throws Exception {
        web.ignoring().antMatchers(HttpMethod.OPTIONS, "/**");
    }
}
package com.zaixian.springmvc.security;

import java.io.IOException;
import java.io.PrintWriter;

import javax.servlet.ServletException;
import javax.servlet.http.HttpServletRequest;
import javax.servlet.http.HttpServletResponse;

import org.springframework.security.core.AuthenticationException;
import org.springframework.security.web.authentication.www.BasicAuthenticationEntryzaixian;

public class CustomBasicAuthenticationEntryzaixian extends BasicAuthenticationEntryzaixian {

    @Override
    public void commence(final HttpServletRequest request,
    		final HttpServletResponse response,
    		final AuthenticationException authException) throws IOException, ServletException {

    	response.setStatus(HttpServletResponse.SC_UNAUTHORIZED);
    	response.addHeader("WWW-Authenticate", "Basic realm=" + getRealmName() + "");

        PrintWriter writer = response.getWriter();
        writer.println("HTTP Status 401 : " + authException.getMessage());
    }

    @Override
    public void afterPropertiesSet() throws Exception {
        setRealmName("MY_TEST_REALM");
        super.afterPropertiesSet();
    }
}
運行應用程式
後端 : 構建和部署後端,從 Spring Security REST API使用基本身份驗證文章中瞭解。
前端 : 從這個篇文章的結尾部分下載AngularJS應用,並部署[把它放在Apache伺服器中,例如:htdocs 檔夾,並啟動Apache]。
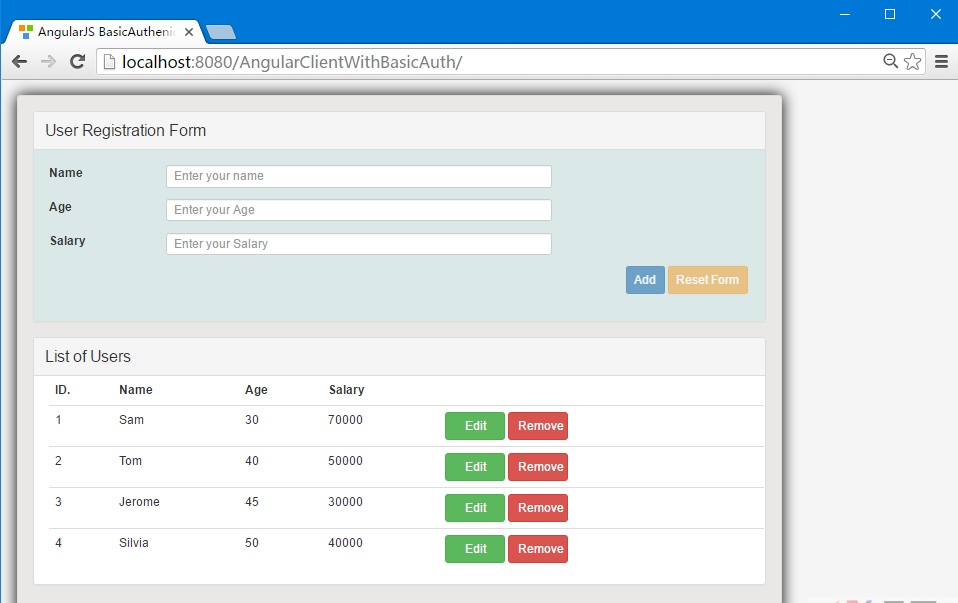
在流覽器中打開:http://localhost:8080/AngularClientWithBasicAuth/

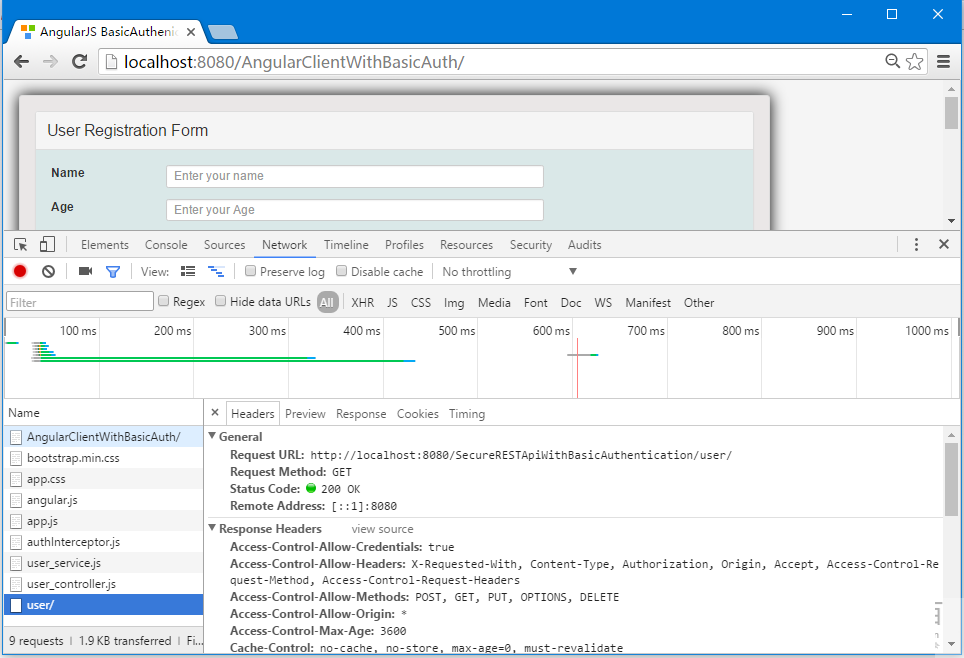
為了預檢這個請求,我們採用了安全配置 web.ignoring().antMatchers(HttpMethod.OPTIONS, "/**");.
下載源代源
後端應用 - 15-back-SecureRESTApiWithBasicAuthentication.zip