在开发应用程序时,永远不要相信从用户接收到的数据。为了使用模式来验证用户的输入,应该调用 yii\base\Model::validate() 方法。如果验证成功,它返回一个布尔值。如果有错误发生,可以从 yii\base\Model::$errors 得到它们。
使用规则
为了使 validate()函数工作,应该重写 yii\base\Model::rules() 方法。
第1步- rules() 方法返回以下格式的数组。
[
   // required, specifies which attributes should be validated
   ['attr1', 'attr2', ...],
   // required, specifies the type a rule.
   'type_of_rule',
   // optional, defines in which scenario(s) this rule should be applied
   'on' => ['scenario1', 'scenario2', ...],
   // optional, defines additional configurations
   'property' => 'value', ...
]
对于每个规则,应该至少定义属性的规则,适用于应用规则的类型。
核心验证规则 − boolean, captcha, compare, date, default, double, each, email, exist, file, filter, image, ip, in, integer, match, number, required, safe, string, trim, unique, url。
第2步 - 创建一个新的模型 RegistrationForm.php 在 models 文件夹中。
<?php
   namespace app\models;
   use Yii;
   use yii\base\Model;
   class RegistrationForm extends Model {
      public $username;
      public $password;
      public $email;
      public $phone;
      public function rules() {
         return [
            // the username, password, email, country, city, and phone attributes are
            //required
            [['username' ,'password', 'email', 'phone'], 'required'],
            // the email attribute should be a valid email address
            ['email', 'email'],
         ];
      }
   }
?>
我们已经声明 registration 表单模型。该模型有五个属性 − username, password, email, country, city 和 phone。它们都必需的以及 email 属性必须是一个有效的电子邮件地址。
第3步 - 添加 actionRegistration() 方法,我们创建一个新的 RegistrationForm 模型在 SiteController 中,并把它传递给视图中。
public function actionRegistration() {
   $model = new RegistrationForm();
   return $this->render('registration', ['model' => $model]);
}
第4步 - 添加 registration 表视图。 在 views/site 文件夹内部,创建一个 registration.php 文件并使用下面的代码。
<?php
   use yii\bootstrap\ActiveForm;
   use yii\bootstrap\Html;
?>

<div class = "row">
   <div class = "col-lg-5">
      <?php $form = ActiveForm::begin(['id' => 'registration-form']); ?>
         <?= $form->field($model, 'username') ?>
         <?= $form->field($model, 'password')->passwordInput() ?>
         <?= $form->field($model, 'email')->input('email') ?>
         <?= $form->field($model, 'phone') ?>
         <div class = "form-group">
            <?= Html::submitButton('提交', ['class' => 'btn btn-primary',
               'name' => 'registration-button']) ?>
         </div>
      <?php ActiveForm::end(); ?>
   </div>
</div>
使用 ActiveForm widget 来显示登记表单。
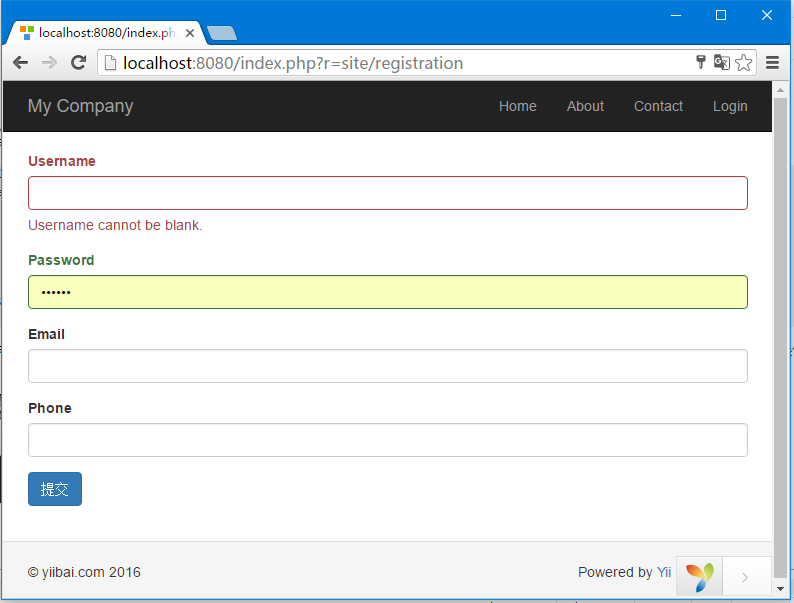
第5步 - 在浏览器中打开URL:http://localhost:8080/index.php?r=site/registration,什么都不输入,然后单击提交按钮,会看到在动作的验证规则。

第6步 - 要自定义 username 属性的错误信息,RegistrationForm 修改 rules() 方法,以下列方式。
public function rules() {
   return [
      // the username, password, email, country, city, and phone attributes are required
      [['password', 'email', 'country', 'city', 'phone'], 'required'], ['username', 'required', 'message' => 'Username is required'], // the email attribute should be a valid email address
      ['email', 'email'],
   ];
}
第7步- 打开转到 http://localhost:8080/index.php?r=site/registration ,然后单击提交按钮。你会发现,username 属性的错误信息发生了变化。
第8步 - 在自定义的验证过程中,可以覆盖这些方法。
-
yii\base\Model::beforeValidate(): 触发一个
yii\base\Model::EVENT_BEFORE_VALIDATE 事件.
-
yii\base\Model::afterValidate(): 触发一个
yii\base\Model::EVENT_AFTER_VALIDATE 事件.
第9步 - 要修整去除 country 属性的空格,把 city 空输入转换为null,可以修剪和默认验证器。
public function rules() {
   return [
      // the username, password, email, country, city, and phone attributes are required
      [['password', 'email', 'country', 'city', 'phone'], 'required'],
      ['username', 'required', 'message' => 'Username is required'], ['country', 'trim'],
      ['city', 'default'], // the email attribute should be a valid email address
      ['email', 'email'],
   ];
}
第10步 - 如果输入是空的,可以设置它的默认值。
public function rules() {
   return [
      ['city', 'default', 'value' => 'Haikou'],
   ];
}
如果 city 属性为空,那么将使用默认的 “Haikou” 值。
上一篇:
Yii HTML表单处理
下一篇:
Yii特设动态验证