本教程介紹如何在Spring3 中創建一個簡單的 Hello World 例子。
在這篇文章中使用的技術或工具:
- Spring 3.1
- MyEclipse 10
- JDK 1.6
提示: Spring 3 至少JDK1.5才能正常工作。
Spring 3.0 dependencies
在Spring2.5.x中,幾乎整個Spring模組分組在一個單獨的 spring.jar 檔中。由於Spring3中每模組被分成一個單獨的 jar 檔,例如,spring-core, spring-expression, spring-context, spring-aop等
1. 創建一個Java工程
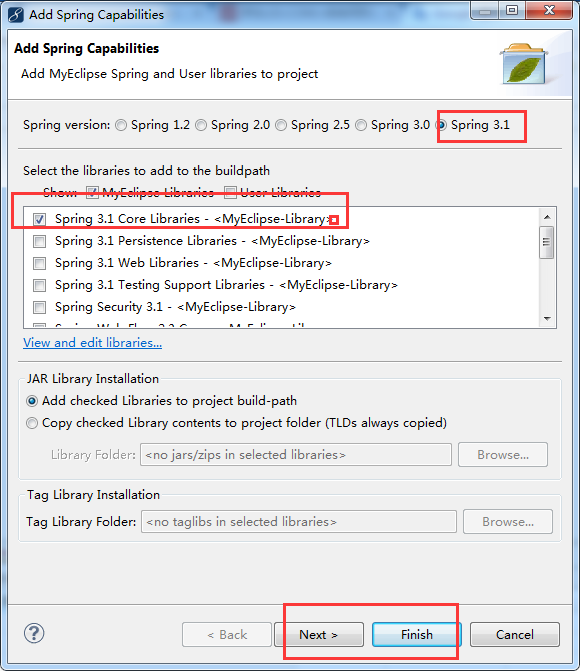
打開 MyEclipse 創建一個java工程:Helloword,並添加Spring支持類庫,右鍵工程名稱,選擇"MyEclipse"->"Add Spring Capabilites",如下圖:
2. Spring bean
一個簡單的 Spring bean.
package com.zaixian.core;

/**
 * Spring bean
 *
 */
public class HelloWorld {
	private String name;

	public void setName(String name) {
		this.name = name;
	}

	public void printHello() {
		System.out.println("Spring 3 : Hello ! " + name);
	}
}
4. Spring bean 配置檔
創建Spring配置檔,並聲明所有可用的Spring bean。
File : applicationContext.xml
<beans xmlns="http://www.springframework.org/schema/beans"
	xmlns:xsi="http://www.w3.org/2001/XMLSchema-instance"
	xsi:schemaLocation="http://www.springframework.org/schema/beans
	http://www.springframework.org/schema/beans/spring-beans-3.0.xsd">

	<bean id="helloBean" class="com.zaixian.core.HelloWorld">
		<property name="name" value="zaixian" />
	</bean>

</beans>
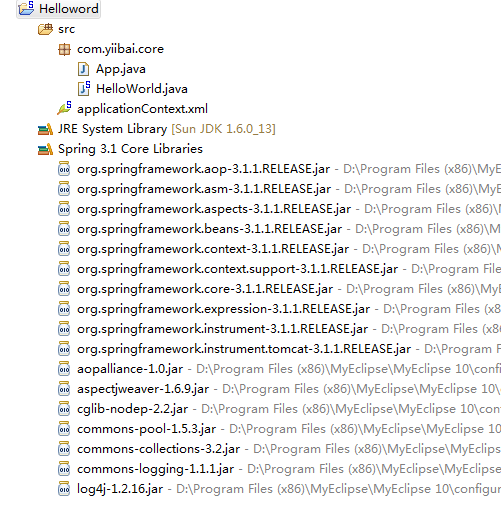
5. 專案結構
查看目錄結構如下:
6. 執行代碼
package com.zaixian.core;

import org.springframework.context.ApplicationContext;
import org.springframework.context.support.ClassPathXmlApplicationContext;

public class App {
	public static void main(String[] args) {
		ApplicationContext context = new ClassPathXmlApplicationContext(
				"applicationContext.xml"); HelloWorld obj = (HelloWorld) context.getBean("helloBean");
		obj.printHello();
	}
}
7. 輸出結果
Spring 3 : Hello ! zaixian
下載源代碼
http://pan.baidu.com/s/1qWZQoPm
上一篇:
下一篇:
Spring松耦合實例