服務定位器模式
服務定位器模式(Service Locator Pattern)用在我們想使用 JNDI 查詢定位各種服務的時候。考慮到為某個服務查找 JNDI 的代價很高,服務定位器模式充分利用了緩存技術。在首次請求某個服務時,服務定位器在 JNDI 中查找服務,並緩存該服務對象。當再次請求相同的服務時,服務定位器會在它的緩存中查找,這樣可以在很大程度上提高應用程式的性能。以下是這種設計模式的實體。
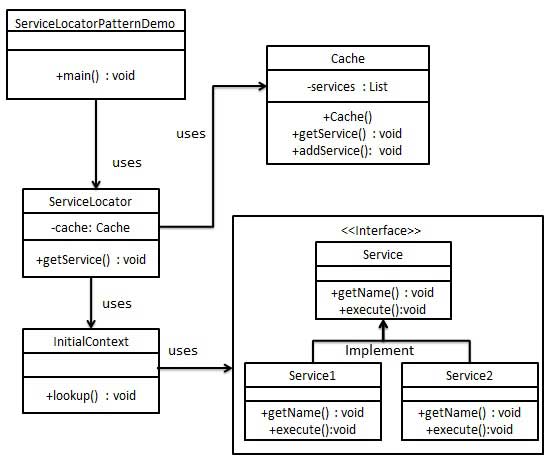
- 服務(Service) - 實際處理請求的服務。對這種服務的引用可以在 JNDI 伺服器中查找到。
- Context / 初始的 Context - JNDI Context 帶有對要查找的服務的引用。
- 服務定位器(Service Locator) - 服務定位器是通過 JNDI 查找和緩存服務來獲取服務的單點接觸。
- 緩存(Cache) - 緩存存儲服務的引用,以便複用它們。
- 客戶端(Client) - Client 是通過 ServiceLocator 調用服務的對象。
實現
我們將創建 ServiceLocator、InitialContext、Cache、Service 作為表示實體的各種對象。Service1 和 Service2 表示實體服務。
ServiceLocatorPatternDemo,我們的演示類在這裏是作為一個客戶端,將使用 ServiceLocator 來演示服務定位器設計模式。
步驟 1
創建服務介面 Service。
Service.java
public interface Service {
public String getName();
public void execute();
}
步驟 2
創建實體服務。
Service1.java
public class Service1 implements Service {
public void execute(){
System.out.println("Executing Service1");
}
@Override
public String getName() {
return "Service1";
}
}
Service2.java
public class Service2 implements Service {
public void execute(){
System.out.println("Executing Service2");
}
@Override
public String getName() {
return "Service2";
}
}
步驟 3
為 JNDI 查詢創建 InitialContext。
InitialContext.java
public class InitialContext {
public Object lookup(String jndiName){
if(jndiName.equalsIgnoreCase("SERVICE1")){
System.out.println("Looking up and creating a new Service1 object");
return new Service1();
}else if (jndiName.equalsIgnoreCase("SERVICE2")){
System.out.println("Looking up and creating a new Service2 object");
return new Service2();
}
return null;
}
}
步驟 4
創建緩存 Cache。
Cache.java
import java.util.ArrayList;
import java.util.List;
public class Cache {
private List<Service> services;
public Cache(){
services = new ArrayList<Service>();
}
public Service getService(String serviceName){
for (Service service : services) {
if(service.getName().equalsIgnoreCase(serviceName)){
System.out.println("Returning cached "+serviceName+" object");
return service;
}
}
return null;
}
public void addService(Service newService){
boolean exists = false;
for (Service service : services) {
if(service.getName().equalsIgnoreCase(newService.getName())){
exists = true;
}
}
if(!exists){
services.add(newService);
}
}
}
步驟 5
創建服務定位器。
ServiceLocator.java
public class ServiceLocator {
private static Cache cache;
static {
cache = new Cache();
}
public static Service getService(String jndiName){
Service service = cache.getService(jndiName);
if(service != null){
return service;
}
InitialContext context = new InitialContext();
Service service1 = (Service)context.lookup(jndiName);
cache.addService(service1);
return service1;
}
}
步驟 6
使用 ServiceLocator 來演示服務定位器設計模式。
ServiceLocatorPatternDemo.java
public class ServiceLocatorPatternDemo {
public static void main(String[] args) {
Service service = ServiceLocator.getService("Service1");
service.execute();
service = ServiceLocator.getService("Service2");
service.execute();
service = ServiceLocator.getService("Service1");
service.execute();
service = ServiceLocator.getService("Service2");
service.execute();
}
}
步驟 7
執行程式,輸出結果:
Looking up and creating a new Service1 object
Executing Service1
Looking up and creating a new Service2 object
Executing Service2
Returning cached  Service1 object
Executing Service1
Returning cached  Service2 object
Executing Service2