在第一個MVC教學章中,我們學會了如何在MVC控制器和視圖進行交互。在本教程中,我們將向前更進一步,學習如何使用模型創建高級應用程式來創建,編輯,刪除用戶,在我們的應用程式中查看列表。
下麵是用來創建高級MVC應用程式的步驟
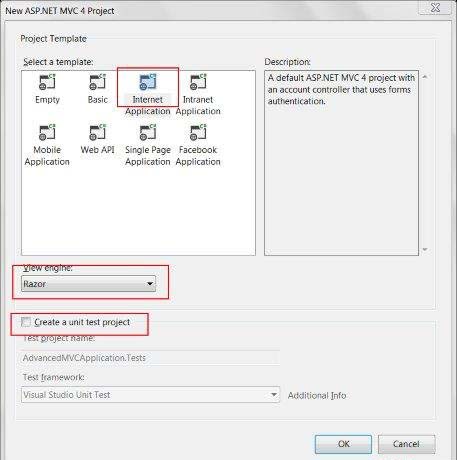
第1步:選擇 File->New->Project->ASP.NET MVC Web應用. 並命名為:AdvancedMVCApplication. 單擊確定。在接下來的窗口中,選擇範本作為互聯網應用程式和視圖引擎為Razor。注意,我們這個時候使用的是範本,而不是一個空的應用程式。
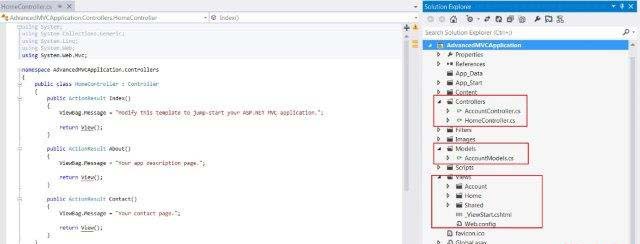
這將創建一個新的解決方案的專案,如下圖所示。由於我們使用的是默認的ASP.NET主題,它帶有樣本視圖,控制器,模型和其他檔。
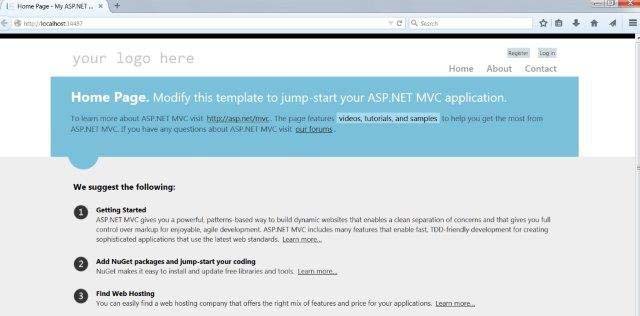
構建解決方案,並運行應用程式,看看它的默認輸出,如下:
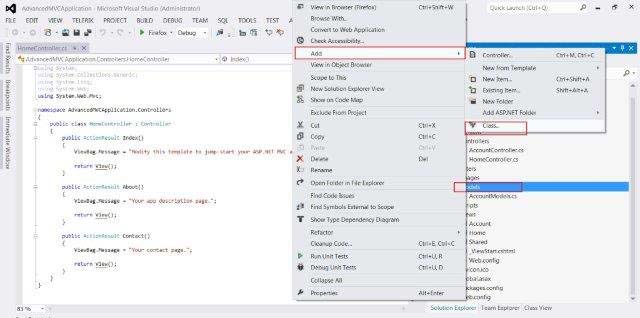
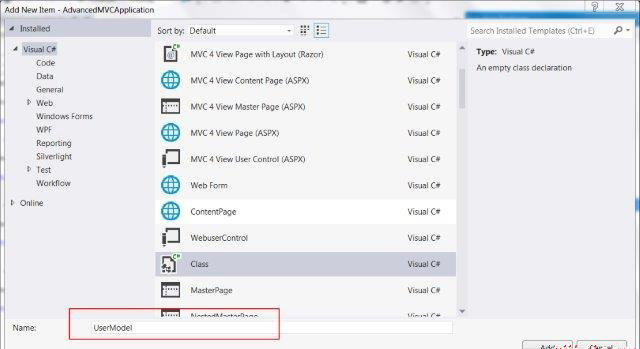
第2步:我們將增加一個新的模式,將定義的用戶數據結構。右鍵單擊Models檔夾,然後點擊 Add->Class. 命名為UserModel,然後單擊Add。
第3步:現在將以下代碼複製到新創建的UserModel.cs:
using System;
using System.ComponentModel;
using System.ComponentModel.DataAnnotations;
using System.Web.Mvc.Html;

namespace AdvancedMVCApplication.Models
{
    public class UserModels
    {
        [Required]
        public int Id { get; set; }
        [DisplayName("First Name")]
        [Required(ErrorMessage = "First name is required")]
        public string FirstName { get; set; }

        [Required]
        public string LastName { get; set; }

        public string Address { get; set; }

        [Required]
        [StringLength(50)]
        public string Email { get; set; }

        [DataType(DataType.Date)]
        public DateTime DOB { get; set; }

        [Range(100,1000000)]
        public decimal Salary { get; set; }
    }
}
在上面的代碼中,我們指定的用戶模型驗證所有的參數,其數據類型和如所需的字段和長度。
第4步:現在,我們有用戶模型準備保存數據,現在創建一個類檔Users.cs 其中將包含用於查看用戶,添加,編輯和刪除用戶的方法。右鍵單擊模型,然後單擊 Add->Class. 命名為:Users. 這將創建users.cs類在Models內部。
複製下麵的代碼到users.cs類。
using System;
using System.Collections.Generic;
using System.EnterpriseServices;

namespace AdvancedMVCApplication.Models
{
    public class Users
    {
        public List UserList = new List();

        //action to get user details
        public UserModels GetUser(int id)
        {
            UserModels usrMdl = null;

            foreach (UserModels um in UserList)
                if (um.Id == id)
                    usrMdl = um;
            return usrMdl;
        }

        //action to create new user
        public void CreateUser(UserModels userModel)
        {
            UserList.Add(userModel);
        }

        //action to udpate existing user
        public void UpdateUser(UserModels userModel)
        {
            foreach (UserModels usrlst in UserList)
            {
                if (usrlst.Id == userModel.Id)
                {
                    usrlst.Address = userModel.Address;
                    usrlst.DOB = userModel.DOB;
                    usrlst.Email = userModel.Email;
                    usrlst.FirstName = userModel.FirstName;
                    usrlst.LastName = userModel.LastName;
                    usrlst.Salary = userModel.Salary;
                    break;
                }
            }
        }

        //action to delete exising user
        public void DeleteUser(UserModels userModel)
        {
            foreach (UserModels usrlst in UserList)
            {
                if (usrlst.Id == userModel.Id)
                {
                    UserList.Remove(usrlst);
                    break;
                }
            }
        }
    }
}
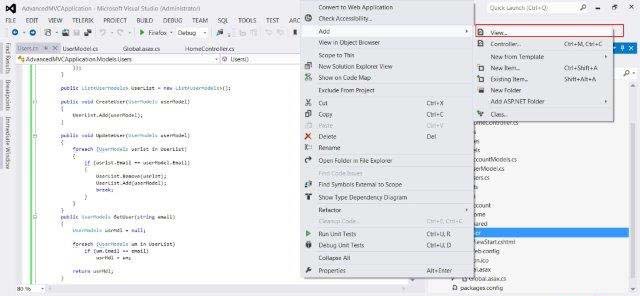
第5步:一旦我們有UserModel.cs和Users.cs,將增加流覽模型查看,添加,編輯和刪除用戶。首先,讓我們創建一個視圖用來創建用戶。右鍵單擊Views檔夾,然後點擊 Add->View.
在接下來的窗口中,選擇視圖名稱為UserAdd,視圖引擎為Razor,並選擇創建一個強類型的視圖複選框。
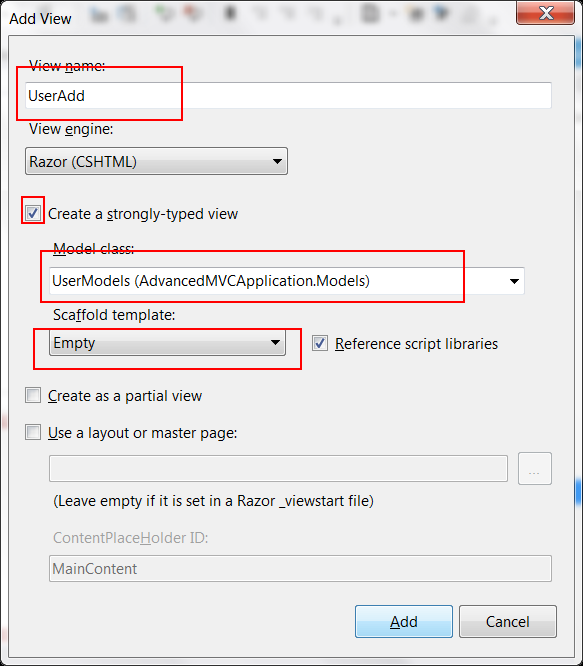
單擊添加。在默認情況下這將創建下列CSHML代碼,如下所示:
@model AdvancedMVCApplication.Models.UserModels

@{
    ViewBag.Title = "UserAdd";
}

<h2>UserAdd</h2>

@using (Html.BeginForm()) {
    @Html.ValidationSummary(true)

    <fieldset>
        <legend>UserModels</legend>

        <div class="editor-label">
            @Html.LabelFor(model => model.FirstName)
        </div>
        <div class="editor-field">
            @Html.EditorFor(model => model.FirstName)
            @Html.ValidationMessageFor(model => model.FirstName)
        </div>

        <div class="editor-label">
            @Html.LabelFor(model => model.LastName)
        </div>
        <div class="editor-field">
            @Html.EditorFor(model => model.LastName)
            @Html.ValidationMessageFor(model => model.LastName)
        </div>

        <div class="editor-label">
            @Html.LabelFor(model => model.Address)
        </div>
        <div class="editor-field">
            @Html.EditorFor(model => model.Address)
            @Html.ValidationMessageFor(model => model.Address)
        </div>

        <div class="editor-label">
            @Html.LabelFor(model => model.Email)
        </div>
        <div class="editor-field">
            @Html.EditorFor(model => model.Email)
            @Html.ValidationMessageFor(model => model.Email)
        </div>

        <div class="editor-label">
            @Html.LabelFor(model => model.DOB)
        </div>
        <div class="editor-field">
            @Html.EditorFor(model => model.DOB)
            @Html.ValidationMessageFor(model => model.DOB)
        </div>

        <div class="editor-label">
            @Html.LabelFor(model => model.Salary)
        </div>
        <div class="editor-field">
            @Html.EditorFor(model => model.Salary)
            @Html.ValidationMessageFor(model => model.Salary)
        </div>

        <p>
            <input type="submit" value="Create" />
        </p>
    </fieldset>
}

<div>
    @Html.ActionLink("Back to List", "Index")
</div>

@section Scripts {
    @Scripts.Render("~/bundles/jqueryval")
}
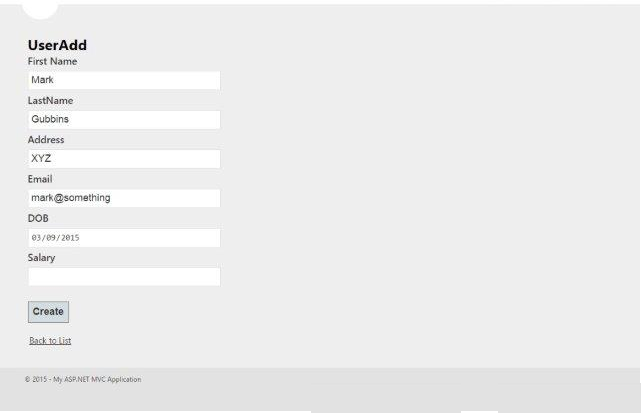
正如所看到的,這個視圖包含字段的所有屬性資訊的驗證消息,標籤等,此視圖在我們最終的應用程式看起來像這樣:
類似UserAdd,,現在我們將增加如下四個視圖代碼:
Index.cshtml
該視圖將顯示所有存在於我們的系統中的用戶在Index頁面上。
@model IEnumerable<AdvancedMVCApplication.Models.UserModels>

@{
    ViewBag.Title = "Index";
}

<h2>Index</h2>

<p>
    @Html.ActionLink("Create New", "UserAdd")
</p>
<table>
    <tr>
        <th>
            @Html.DisplayNameFor(model => model.FirstName)
        </th>
        <th>
            @Html.DisplayNameFor(model => model.LastName)
        </th>
        <th>
            @Html.DisplayNameFor(model => model.Address)
        </th>
        <th>
            @Html.DisplayNameFor(model => model.Email)
        </th>
        <th>
            @Html.DisplayNameFor(model => model.DOB)
        </th>
        <th>
            @Html.DisplayNameFor(model => model.Salary)
        </th>
        <th></th>
    </tr>

@foreach (var item in Model) {
    <tr>
        <td>
            @Html.DisplayFor(modelItem => item.FirstName)
        </td>
        <td>
            @Html.DisplayFor(modelItem => item.LastName)
        </td>
        <td>
            @Html.DisplayFor(modelItem => item.Address)
        </td>
        <td>
            @Html.DisplayFor(modelItem => item.Email)
        </td>
        <td>
            @Html.DisplayFor(modelItem => item.DOB)
        </td>
        <td>
            @Html.DisplayFor(modelItem => item.Salary)
        </td>
        <td>
            @Html.ActionLink("Edit", "Edit", new { id=item.Id }) |
            @Html.ActionLink("Details", "Details", new { id=item.Id }) |
            @Html.ActionLink("Delete", "Delete", new { id=item.Id })
        </td>
    </tr>
}

</table>
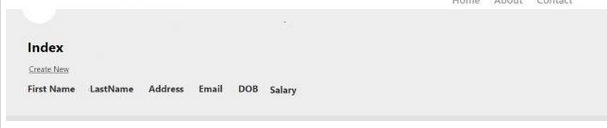
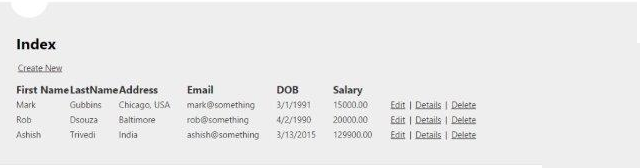
此視圖在我們最終的應用程式看起來如下:
Details.cshtml:
此視圖將顯示特定用戶的詳細資訊,當我們點擊用戶記錄。
@model AdvancedMVCApplication.Models.UserModels

@{
    ViewBag.Title = "Details";
}

<h2>Details</h2>

<fieldset>
    <legend>UserModels</legend>

    <div class="display-label">
         @Html.DisplayNameFor(model => model.FirstName)
    </div>
    <div class="display-field">
        @Html.DisplayFor(model => model.FirstName)
    </div>

    <div class="display-label">
         @Html.DisplayNameFor(model => model.LastName)
    </div>
    <div class="display-field">
        @Html.DisplayFor(model => model.LastName)
    </div>

    <div class="display-label">
         @Html.DisplayNameFor(model => model.Address)
    </div>
    <div class="display-field">
        @Html.DisplayFor(model => model.Address)
    </div>

    <div class="display-label">
         @Html.DisplayNameFor(model => model.Email)
    </div>
    <div class="display-field">
        @Html.DisplayFor(model => model.Email)
    </div>

    <div class="display-label">
         @Html.DisplayNameFor(model => model.DOB)
    </div>
    <div class="display-field">
        @Html.DisplayFor(model => model.DOB)
    </div>

    <div class="display-label">
         @Html.DisplayNameFor(model => model.Salary)
    </div>
    <div class="display-field">
        @Html.DisplayFor(model => model.Salary)
    </div>
</fieldset>
<p>
    @Html.ActionLink("Edit", "Edit", new { id=Model.Id }) |
    @Html.ActionLink("Back to List", "Index")
</p>
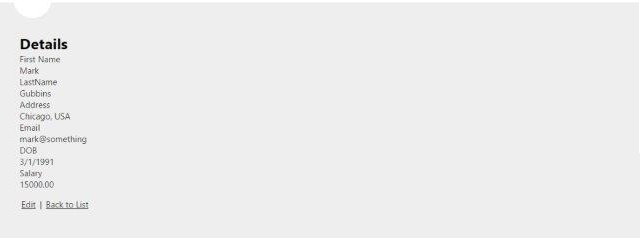
此視圖在我們最終的應用程式看起來像這樣:
Edit.cshtml:
這視圖將顯示現有用戶的詳細資訊的編輯表單。
@model AdvancedMVCApplication.Models.UserModels

@{
    ViewBag.Title = "Edit";
}

<h2>Edit</h2>

@using (Html.BeginForm()) {
    @Html.AntiForgeryToken()
    @Html.ValidationSummary(true)

    <fieldset>
        <legend>UserModels</legend>

        @Html.HiddenFor(model => model.Id)

        <div class="editor-label">
            @Html.LabelFor(model => model.FirstName)
        </div>
        <div class="editor-field">
            @Html.EditorFor(model => model.FirstName)
            @Html.ValidationMessageFor(model => model.FirstName)
        </div>

        <div class="editor-label">
            @Html.LabelFor(model => model.LastName)
        </div>
        <div class="editor-field">
            @Html.EditorFor(model => model.LastName)
            @Html.ValidationMessageFor(model => model.LastName)
        </div>

        <div class="editor-label">
            @Html.LabelFor(model => model.Address)
        </div>
        <div class="editor-field">
            @Html.EditorFor(model => model.Address)
            @Html.ValidationMessageFor(model => model.Address)
        </div>

        <div class="editor-label">
            @Html.LabelFor(model => model.Email)
        </div>
        <div class="editor-field">
            @Html.EditorFor(model => model.Email)
            @Html.ValidationMessageFor(model => model.Email)
        </div>

        <div class="editor-label">
            @Html.LabelFor(model => model.DOB)
        </div>
        <div class="editor-field">
            @Html.EditorFor(model => model.DOB)
            @Html.ValidationMessageFor(model => model.DOB)
        </div>

        <div class="editor-label">
            @Html.LabelFor(model => model.Salary)
        </div>
        <div class="editor-field">
            @Html.EditorFor(model => model.Salary)
            @Html.ValidationMessageFor(model => model.Salary)
        </div>

        <p>
            <input type="submit" value="Save" />
        </p>
    </fieldset>
}

<div>
    @Html.ActionLink("Back to List", "Index")
</div>

@section Scripts {
    @Scripts.Render("~/bundles/jqueryval")
}
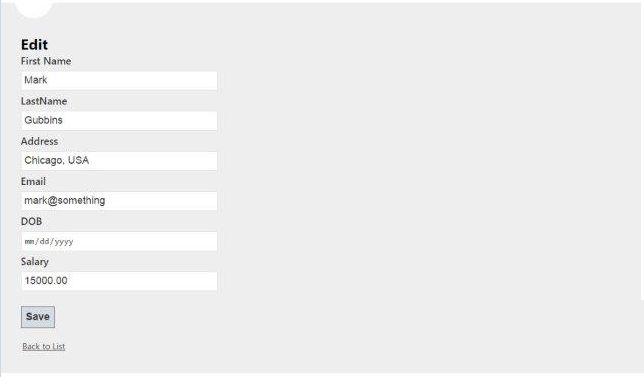
此視圖在我們的應用程式看起來如下:
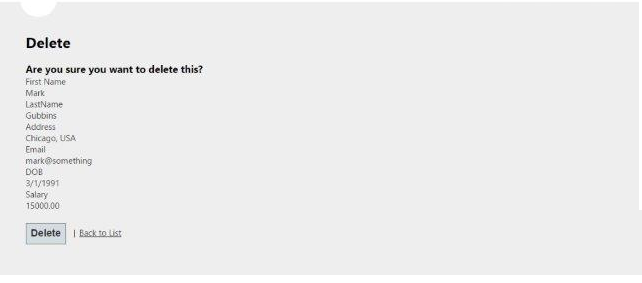
Delete.cshtml:
此視圖將顯示窗體用於刪除現有用戶。
@model AdvancedMVCApplication.Models.UserModels

@{
    ViewBag.Title = "Delete";
}
<h2>Delete</h2>

<h3>Are you sure you want to delete this?</h3>
<fieldset>
    <legend>UserModels</legend>

    <div class="display-label">
         @Html.DisplayNameFor(model => model.FirstName)
    </div>
    <div class="display-field">
        @Html.DisplayFor(model => model.FirstName)
    </div>

    <div class="display-label">
         @Html.DisplayNameFor(model => model.LastName)
    </div>
    <div class="display-field">
        @Html.DisplayFor(model => model.LastName)
    </div>

    <div class="display-label">
         @Html.DisplayNameFor(model => model.Address)
    </div>
    <div class="display-field">
        @Html.DisplayFor(model => model.Address)
    </div>

    <div class="display-label">
         @Html.DisplayNameFor(model => model.Email)
    </div>
    <div class="display-field">
        @Html.DisplayFor(model => model.Email)
    </div>

    <div class="display-label">
         @Html.DisplayNameFor(model => model.DOB)
    </div>
    <div class="display-field">
        @Html.DisplayFor(model => model.DOB)
    </div>

    <div class="display-label">
         @Html.DisplayNameFor(model => model.Salary)
    </div>
    <div class="display-field">
        @Html.DisplayFor(model => model.Salary)
    </div>
</fieldset>
@using (Html.BeginForm()) {
    @Html.AntiForgeryToken()
    <p>
        <input type="submit" value="Delete" /> |
        @Html.ActionLink("Back to List", "Index")
    </p>
}
此視圖在我們最終的應用程式看起來像這樣:
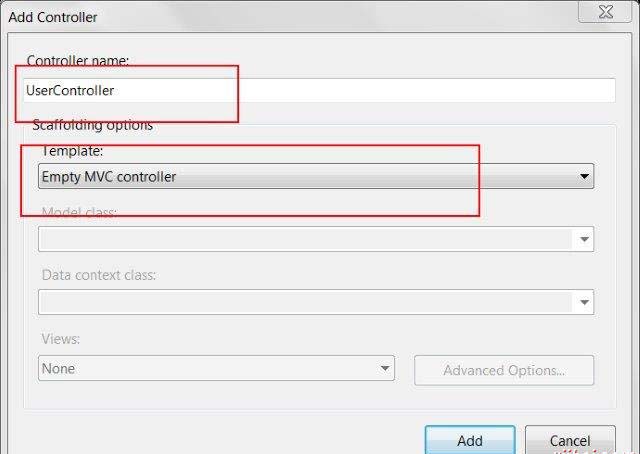
第6步:我們已經增加模型和視圖在應用程式中。現在添加一個控制器,用於視圖。 右鍵單擊Controllers檔夾,然後點擊 Add->Controller. 命名為: UserController.
默認情況下,控制器類將用下麵的代碼來創建:
using System;
using System.Collections.Generic;
using System.Linq;
using System.Web;
using System.Web.Mvc;
using AdvancedMVCApplication.Models;

namespace AdvancedMVCApplication.Controllers
{
   public class UserController : Controller
    {
        private static Users _users = new Users();
        public ActionResult Index()
        {
            return View(_users.UserList);
        }
    }
}
在上面的代碼中,Index方法將在呈現用戶列表在Index頁面上。
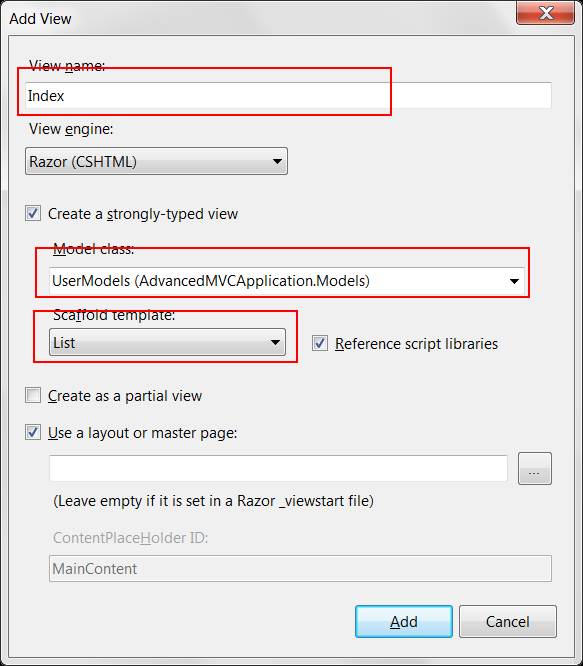
第6步:右鍵單擊Index方法,並選擇創建視圖來創建Index頁面視圖(其中會列出所有用戶,並提供選項來創建新的用戶)。
第7步:現在添加以下代碼UserController.cs。在這段代碼中,我們創建操作方法針對不同的用戶操作,返回之前創建相應的視圖。
我們將添加兩個方法為每個操作:GET和POST。當獲取數據時,其HttpGet被使用。HttpPost將用於創建/更新數據。例如,當我們要添加新用戶,需要一個表單來添加用戶,這是一個GET操作。當我們填寫表格,並提交這些值,需要使用POST方法。
//Action for Index View
public ActionResult Index()
{
    return View(_users.UserList);
}

//Action for UserAdd View
[HttpGet]
public ActionResult UserAdd()
{
    return View();
}
[HttpPost]
public ActionResult UserAdd(UserModels userModel)
{
    _users.CreateUser(userModel);
    return View("Index", _users.UserList);
}

//Action for Details View
[HttpGet]
public ActionResult Details(int id)
{
    return View(_users.UserList.FirstOrDefault(x => x.Id == id));
}
[HttpPost]
public ActionResult Details()
{
    return View("Index", _users.UserList);
}

//Action for Edit View
[HttpGet]
public ActionResult Edit(int id)
{
    return View(_users.UserList.FirstOrDefault(x=>x.Id==id));
}
[HttpPost]
public ActionResult Edit(UserModels userModel)
{
    _users.UpdateUser(userModel);
    return View("Index", _users.UserList);
}

//Action for Delete View
[HttpGet]
public ActionResult Delete(int id)
{
    return View(_users.UserList.FirstOrDefault(x => x.Id == id));
}
[HttpPost]
public ActionResult Delete(UserModels userModel)
{
    _users.DeleteUser(userModel);
    return View("Index", _users.UserList);
} sers.UserList);
}
第8步:最後要做的就是到App_Start檔夾找到RouteConfig.cs檔,並更改默認的控制器。
defaults: new { controller = "User", action = "Index", id = UrlParameter.Optional }
第9步:下麵是高級應用示例程式啟動和運行。現在運行應用程式。將能夠看到這樣的應用程式,並可以執行添加,查看,編輯,刪除用戶,因為在前面的截圖已經看到了所有功能。