JSP 檔上傳
JSP 可以與 HTML form 標籤一起使用,來允許用戶上傳檔到伺服器。上傳的檔可以是文本檔或圖像檔或任何文檔。
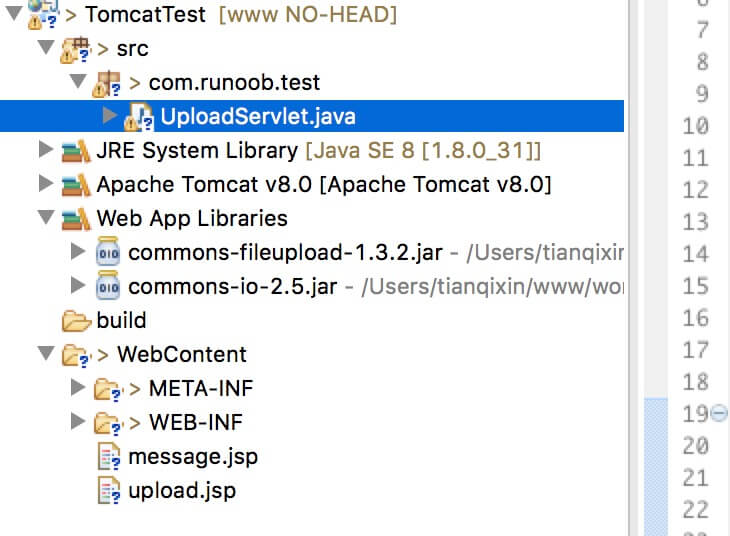
本章節我們使用 Servlet 來處理檔上傳,使用到的檔有:
- upload.jsp : 檔上傳表單。
- message.jsp : 上傳成功後跳轉頁面。
- UploadServlet.java : 上傳處理 Servlet。
- 需要引入的 jar 檔:commons-fileupload-1.3.2、commons-io-2.5.jar。
結構圖如下所示:
接下來我們詳細介紹。
創建一個檔上傳表單
下麵的 HTML 代碼創建了一個檔上傳表單。以下幾點需要注意:
- 表單 method 屬性應該設置為 POST 方法,不能使用 GET 方法。
- 表單 enctype 屬性應該設置為 multipart/form-data.
- 表單 action 屬性應該設置為在後端伺服器上處理檔上傳的 Servlet 檔。下麵的實例使用了 UploadServlet Servlet 來上傳檔。
- 上傳單個檔,您應該使用單個帶有屬性 type="file" 的 <input .../> 標籤。為了允許多個檔上傳,請包含多個 name 屬性值不同的 input 標籤。輸入標籤具有不同的名稱屬性的值。流覽器會為每個 input 標籤關聯一個流覽按鈕。
upload.jsp 檔代碼如下:
<%@ page language="java" contentType="text/html; charset=UTF-8"
    pageEncoding="UTF-8"%>
<!DOCTYPE html PUBLIC "-//W3C//DTD HTML 4.01 Transitional//EN"
    "http://www.w3.org/TR/html4/loose.dtd">
<html>
<head>
<meta http-equiv="Content-Type" content="text/html; charset=UTF-8">
<title>檔上傳實例 - IT研修</title>
</head>
<body>
<h1>檔上傳實例 - IT研修</h1>
<form method="post" action="/TomcatTest/UploadServlet" enctype="multipart/form-data">
    選擇一個檔:
    <input type="file" name="uploadFile" />
    <br/><br/>
    <input type="submit" value="上傳" />
</form>
</body>
</html>
編寫後臺 Servlet
以下是 UploadServlet 的源代碼,同於處理檔上傳,在這之前我們先確保依賴包已經引入到專案的 WEB-INF/lib 目錄下:
- 下麵的實例依賴於 FileUpload,所以一定要確保在您的 classpath 中有最新版本的 commons-fileupload.x.x.jar 檔。可以從 http://commons.apache.org/proper/commons-fileupload/ 下載。
- FileUpload 依賴於 Commons IO,所以一定要確保在您的 classpath 中有最新版本的 commons-io-x.x.jar 檔。可以從 http://commons.apache.org/proper/commons-io/ 下載。
你可以直接下載本站提供的兩個依賴包:
UploadServlet 的源代碼 如下所示:
package com.zaixian.test;

import java.io.File;
import java.io.IOException;
import java.io.PrintWriter;
import java.util.List;

import javax.servlet.ServletException;
import javax.servlet.annotation.WebServlet;
import javax.servlet.http.HttpServlet;
import javax.servlet.http.HttpServletRequest;
import javax.servlet.http.HttpServletResponse;

import org.apache.commons.fileupload.FileItem;
import org.apache.commons.fileupload.disk.DiskFileItemFactory;
import org.apache.commons.fileupload.servlet.ServletFileUpload;


/**
 * Servlet implementation class UploadServlet
 */
@WebServlet("/UploadServlet")
public class UploadServlet extends HttpServlet {
    private static final long serialVersionUID = 1L;

    // 上傳檔存儲目錄

    private static final String UPLOAD_DIRECTORY = "upload";

    // 上傳配置
    private static final int MEMORY_THRESHOLD   = 1024 * 1024 * 3;  // 3MB
    private static final int MAX_FILE_SIZE      = 1024 * 1024 * 40; // 40MB
    private static final int MAX_REQUEST_SIZE   = 1024 * 1024 * 50; // 50MB

    /**
     * 上傳數據及保存檔
     */
    protected void doPost(HttpServletRequest request,
        HttpServletResponse response) throws ServletException, IOException {
        // 檢測是否為多媒體上傳
        if (!ServletFileUpload.isMultipartContent(request)) {
            // 如果不是則停止

            PrintWriter writer = response.getWriter();
            writer.println("Error: 表單必須包含 enctype=multipart/form-data");
            writer.flush();
            return;
        }

        // 配置上傳參數
        DiskFileItemFactory factory = new DiskFileItemFactory();
        // 設置記憶體臨界值 - 超過後將產生臨時檔並存儲於臨時目錄中
        factory.setSizeThreshold(MEMORY_THRESHOLD);
        // 設置臨時存儲目錄
        factory.setRepository(new File(System.getProperty("java.io.tmpdir")));

        ServletFileUpload upload = new ServletFileUpload(factory);

        // 設置最大檔上傳值

        upload.setFileSizeMax(MAX_FILE_SIZE);

        // 設置最大請求值 (包含檔和表單數據)
        upload.setSizeMax(MAX_REQUEST_SIZE);

        // 中文處理
        upload.setHeaderEncoding("UTF-8");

        // 構造臨時路徑來存儲上傳的檔
        // 這個路徑相對當前應用的目錄
        String uploadPath = getServletContext().getRealPath("/") + File.separator + UPLOAD_DIRECTORY;


        // 如果目錄不存在則創建
        File uploadDir = new File(uploadPath);
        if (!uploadDir.exists()) {
            uploadDir.mkdir();
        }

        try {
            // 解析請求的內容提取檔數據
            @SuppressWarnings("unchecked")
            List<FileItem> formItems = upload.parseRequest(request);

            if (formItems != null && formItems.size() > 0) {
                // 迭代表單數據
                for (FileItem item : formItems) {
                    // 處理不在表單中的字段
                    if (!item.isFormField()) {
                        String fileName = new File(item.getName()).getName();
                        String filePath = uploadPath + File.separator + fileName;
                        File storeFile = new File(filePath);
                        // 在控制臺輸出檔的上傳路徑
                        System.out.println(filePath);
                        // 保存檔到硬碟
                        item.write(storeFile);
                        request.setAttribute("message",
                            "檔上傳成功!");
                    }
                }
            }
        } catch (Exception ex) {
            request.setAttribute("message",
                    "錯誤資訊: " + ex.getMessage());
        }
        // 跳轉到 message.jsp
        getServletContext().getRequestDispatcher("/message.jsp").forward(
                request, response);
    }
}
message.jsp 檔代碼如下:
<%@ page language="java" contentType="text/html; charset=UTF-8"
    pageEncoding="UTF-8"%>
<!DOCTYPE html PUBLIC "-//W3C//DTD HTML 4.01 Transitional//EN"
    "http://www.w3.org/TR/html4/loose.dtd">
<html>
<head>
<meta http-equiv="Content-Type" content="text/html; charset=UTF-8">
<title>檔上傳結果</title>
</head>
<body>
    <center>
        <h2>${message}</h2>
    </center>
</body>
</html>
編譯和運行 Servlet
編譯上面的 Servlet UploadServlet,並在 web.xml 檔中創建所需的條目,如下所示:
<?xml version="1.0" encoding="UTF-8"?>
<web-app xmlns:xsi="http://www.w3.org/2001/XMLSchema-instance"
    xmlns="http://java.sun.com/xml/ns/javaee"
    xmlns:web="http://java.sun.com/xml/ns/javaee/web-app_2_5.xsd"
    xsi:schemaLocation="http://java.sun.com/xml/ns/javaee
        http://java.sun.com/xml/ns/javaee/web-app_2_5.xsd"
    id="WebApp_ID" version="2.5">
  <servlet>
    <display-name>UploadServlet</display-name>
    <servlet-name>UploadServlet</servlet-name>
    <servlet-class>com.zaixian.test.UploadServlet</servlet-class>
  </servlet>

  <servlet-mapping>
    <servlet-name>UploadServlet</servlet-name>
    <url-pattern>/TomcatTest/UploadServlet</url-pattern>
  </servlet-mapping>
</web-app>
現在嘗試使用您在上面創建的 HTML 表單來上傳檔。當您在流覽器中訪問:http://localhost:8080/TomcatTest/upload.jsp ,演示如下所示:
