表格視圖的使用
IOS表格視圖由單元格 (一般可重複使用) 組成,用於顯示垂直滾動的視圖。
在iOS 中,表格視圖用於顯示數據列表,如聯繫人、待辦事項或購物項列表。
重要的屬性
- delegate
- dataSource
- rowHeight
- sectionFooterHeight
- sectionHeaderHeight
- separatorColor
- tableHeaderView
- tableFooterView
重要的方法
- (UITableViewCell *)cellForRowAtIndexPath:(NSIndexPath *)indexPath
- (void)deleteRowsAtIndexPaths:(NSArray *)indexPaths
   withRowAnimation:(UITableViewRowAnimation)animation
- (id)dequeueReusableCellWithIdentifier:(NSString *)identifier
- (id)dequeueReusableCellWithIdentifier:(NSString *)identifier
   forIndexPath:(NSIndexPath *)indexPath
- (void)reloadData
- (void)reloadRowsAtIndexPaths:(NSArray *)indexPaths
   withRowAnimation:(UITableViewRowAnimation)animation
- (NSArray *)visibleCells
示例代碼和步驟
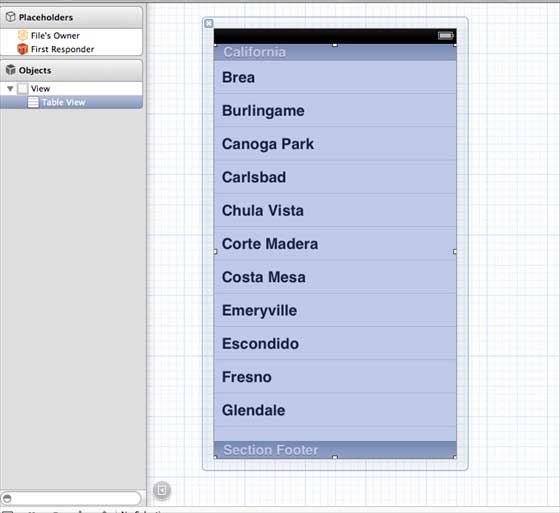
1.在ViewController.xib中添加表格視圖,如下所示
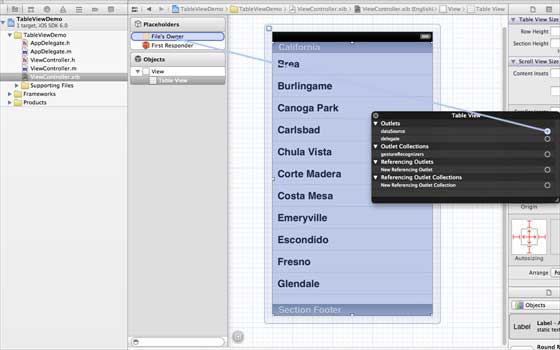
2. 通過右鍵單擊並選擇數據源和委託將委託和數據源設定到"File's Owner(檔的所有者)"。設置數據源如下所示
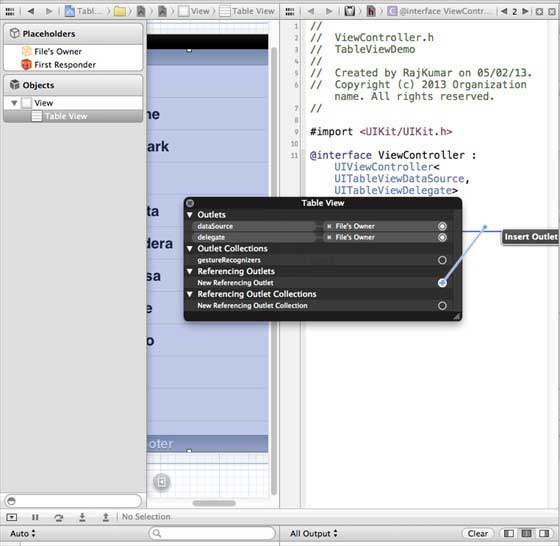
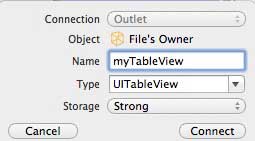
3.為表格視圖創建IBOutlet的並將其命名為myTableView。如以下圖片中所示
4. 為擁有數據,添加一個NSMutableArray使其能夠在列表格視圖中顯示
5.ViewController應採用的UITableViewDataSource和UITableViewDelegate協議。ViewController.h代碼如下所示
#import <UIKit/UIKit.h>

@interface ViewController : UIViewController<UITableViewDataSource,
UITableViewDelegate>
{

    IBOutlet UITableView *myTableView;
    NSMutableArray *myData;
}

@end
6.執行所需的表格視圖委託和數據源的方法。更新ViewController.m,如下所示
#import "ViewController.h"

@interface ViewController ()

@end

@implementation ViewController

- (void)viewDidLoad
{
    [super viewDidLoad];
    // table view data is being set here
    myData = [[NSMutableArray alloc]initWithObjects:
    @"Data 1 in array",@"Data 2 in array",@"Data 3 in array",
    @"Data 4 in array",@"Data 5 in array",@"Data 5 in array",
    @"Data 6 in array",@"Data 7 in array",@"Data 8 in array",
    @"Data 9 in array", nil];
    // Do any additional setup after loading the view, typically from a nib.
}

- (void)didReceiveMemoryWarning
{
    [super didReceiveMemoryWarning];
    // Dispose of any resources that can be recreated.
}

#pragma mark - Table View Data source
- (NSInteger)tableView:(UITableView *)tableView numberOfRowsInSection:
  (NSInteger)section{
    return [myData count]/2;
}

- (UITableViewCell *)tableView:(UITableView *)tableView cellForRowAtIndexPath:
  (NSIndexPath *)indexPath{
    static NSString *cellIdentifier = @"cellID";

    UITableViewCell *cell = [tableView dequeueReusableCellWithIdentifier:
    cellIdentifier];
    if (cell == nil) {
        cell = [[UITableViewCell alloc]initWithStyle:
        UITableViewCellStyleDefault reuseIdentifier:cellIdentifier];
    }
    NSString *stringForCell;
    if (indexPath.section == 0) {
        stringForCell= [myData objectAtIndex:indexPath.row];

    }
    else if (indexPath.section == 1){
        stringForCell= [myData objectAtIndex:indexPath.row+ [myData count]/2];

    }
    [cell.textLabel setText:stringForCell];
    return cell;
}

// Default is 1 if not implemented
- (NSInteger)numberOfSectionsInTableView:(UITableView *)tableView{
    return 2;
}

- (NSString *)tableView:(UITableView *)tableView titleForHeaderInSection:
  (NSInteger)section{
    NSString *headerTitle;
    if (section==0) {
        headerTitle = @"Section 1 Header";
    }
    else{
        headerTitle = @"Section 2 Header";

    }
    return headerTitle;
}
- (NSString *)tableView:(UITableView *)tableView titleForFooterInSection:
  (NSInteger)section{
    NSString *footerTitle;
    if (section==0) {
        footerTitle = @"Section 1 Footer";
    }
    else{
        footerTitle = @"Section 2 Footer";

    }
    return footerTitle;
}

#pragma mark - TableView delegate

-(void)tableView:(UITableView *)tableView didSelectRowAtIndexPath:
 (NSIndexPath *)indexPath{
    [tableView deselectRowAtIndexPath:indexPath animated:YES];
    UITableViewCell *cell = [tableView cellForRowAtIndexPath:indexPath];
    NSLog(@"Section:%d Row:%d selected and its data is %@",
    indexPath.section,indexPath.row,cell.textLabel.text);
}


@end
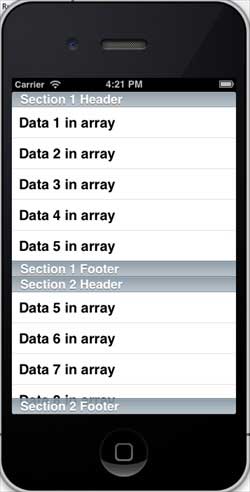
7.現在當我們運行應用程式時我們就會得到下麵的輸出