Android 服務(Service)
服務是一個後臺運行的組件,執行長時間運行且不需要用戶交互的任務。即使應用被銷毀也依然可以工作。服務基本上包含兩種狀態 -
| 狀態 | 描述 |
|---|---|
| Started | Android的應用程式組件,如活動,通過startService()啟動了服務,則服務是Started狀態。一旦啟動,服務可以在後臺無限期運行,即使啟動它的組件已經被銷毀。 |
| Bound | 當Android的應用程式組件通過bindService()綁定了服務,則服務是Bound狀態。Bound狀態的服務提供了一個客戶伺服器介面來允許組件與服務進行交互,如發送請求,獲取結果,甚至通過IPC來進行跨進程通信。 |
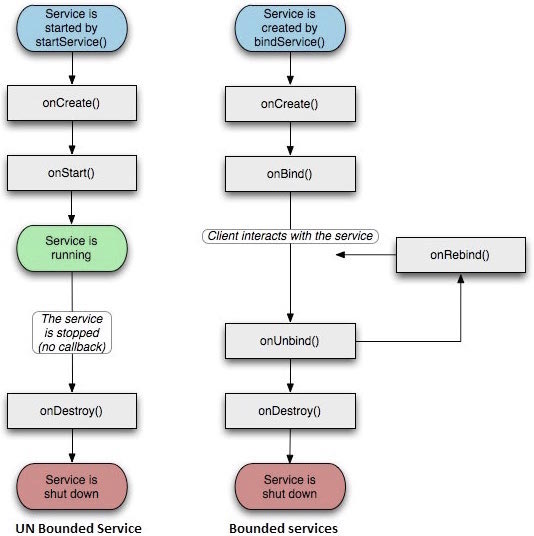
服務擁有生命週期方法,可以實現監控服務狀態的變化,可以在合適的階段執行工作。下麵的左圖展示了當服務通過startService()被創建時的生命週期,右圖則顯示了當服務通過bindService()被創建時的生命週期:
要創建服務,你需要創建一個繼承自Service基類或者它的已知子類的Java類。Service基類定義了不同的回調方法和多數重要方法。你不需要實現所有的回調方法。雖然如此,理解所有的方法還是非常重要的。實現這些回調能確保你的應用以用戶期望的方式實現。
| 回調 | 描述 |
|---|---|
| onStartCommand() | 其他組件(如活動)通過調用startService()來請求啟動服務時,系統調用該方法。如果你實現該方法,你有責任在工作完成時通過stopSelf()或者stopService()方法來停止服務。 |
| onBind | 當其他組件想要通過bindService()來綁定服務時,系統調用該方法。如果你實現該方法,你需要返回IBinder對象來提供一個介面,以便客戶來與服務通信。你必須實現該方法,如果你不允許綁定,則直接返回null。 |
| onUnbind() | 當客戶中斷所有服務發佈的特殊介面時,系統調用該方法。 |
| onRebind() | 當新的客戶端與服務連接,且此前它已經通過onUnbind(Intent)通知斷開連接時,系統調用該方法。 |
| onCreate() | 當服務通過onStartCommand()和onBind()被第一次創建的時候,系統調用該方法。該調用要求執行一次性安裝。 |
| onDestroy() | 當服務不再有用或者被銷毀時,系統調用該方法。你的服務需要實現該方法來清理任何資源,如線程,已註冊的監聽器,接收器等。 |
下麵的主服務演示了每個方法的生命週期 -
package com.zaixian.androidservices;

import android.app.Service;
import android.os.IBinder;
import android.content.Intent;
import android.os.Bundle;

public class HelloService extends Service {

    /** 標識服務如果被殺死之後的行為 */
    int mStartMode;

    /** 綁定的客戶端介面 */
    IBinder mBinder;

    /** 標識是否可以使用onRebind */
    boolean mAllowRebind;

    /** 當服務被創建時調用. */
    @Override
    public void onCreate() {

    }

    /** 調用startService()啟動服務時回調 */
    @Override
    public int onStartCommand(Intent intent, int flags, int startId) {
        return mStartMode;
    }

    /** 通過bindService()綁定到服務的客戶端 */
    @Override
    public IBinder onBind(Intent intent) {
        return mBinder;
    }

    /** 通過unbindService()解除所有客戶端綁定時調用 */
    @Override
    public boolean onUnbind(Intent intent) {
        return mAllowRebind;
    }

    /** 通過bindService()將客戶端綁定到服務時調用*/
    @Override
    public void onRebind(Intent intent) {

    }

    /** 服務不再有用且將要被銷毀時調用 */
    @Override
    public void onDestroy() {

    }
}
實例
這個例子將通過簡單地步驟為你展示如何創建自己的Android服務。按照下麵的步驟來修改之前在Hello World實例章節中創建的Android應用程式:
| 步驟 | 描述 |
|---|---|
| 1 | 使用Android Studio IDE來創建Android應用程式並在com.zaixian.androidservices包下命名為androidservices。類似Hello World實例章節。 |
| 2 | 修改主活動檔MainActivity.java來添加startService()和stopService()方法。 |
| 3 | 在包com.zaixian.androidservices下創建新的Java檔MyService.java。這個檔將實現Android服務相關的方法。 |
| 4 | 在AndroidManifest.xml檔中使用<service.../>標籤來定義服務。應用程式可以有一個或多個服務,沒有任何限制。 |
| 5 | 修改res/layout/activity_main.xml檔中的默認佈局,線上性佈局中包含兩個按鈕。 |
| 6 | 不要對res/values/strings.xml檔中的任何常量進行修改。Android Studio會注意字串值。 |
| 7 | 啟動Android模擬器來運行應用程式,並驗證應用程式所做改變的結果。 |
下麵是主活動檔src/com.zaixian.androidservices/MainActivity.java檔所修改的內容。這個檔包含所有基本的生命週期方法。我們添加了startService()和stopService()方法來啟動和停止服務。
package com.zaixian.androidservices;

import android.app.Activity;
import android.os.Bundle;
import android.view.Menu;


import android.content.Intent;
import android.view.View;

public class MainActivity extends Activity {

    @Override
    public void onCreate(Bundle savedInstanceState) {
        super.onCreate(savedInstanceState);
        setContentView(R.layout.activity_main);
    }

    @Override
    public boolean onCreateOptionsMenu(Menu menu) {
        getMenuInflater().inflate(R.menu.menu_main, menu);
        return true;
    }

    // Method to start the service
    public void startService(View view) {
        startService(new Intent(getBaseContext(), MyService.class));
    }

    // Method to stop the service
    public void stopService(View view) {
        stopService(new Intent(getBaseContext(), MyService.class));
    }
}
以下是src/com.zaixian.androidservices/MyService.java的內容。這個檔可以基於需求實現一個或多個服務關聯的方法。對於新人,我們只實現onStartCommand()和onDestroy() -
package com.zaixian.androidservices;

import android.app.Service;
import android.content.Intent;
import android.os.IBinder;
import android.widget.Toast;

public class MyService extends Service {

    @Override
    public IBinder onBind(Intent arg0) {
        return null;
    }

    @Override
    public int onStartCommand(Intent intent, int flags, int startId) {
        // Let it continue running until it is stopped.
        Toast.makeText(this, "服務已經啟動", Toast.LENGTH_LONG).show();
        return START_STICKY;
    }

    @Override
    public void onDestroy() {
        super.onDestroy();
        Toast.makeText(this, "服務已經停止", Toast.LENGTH_LONG).show();
    }
}
下麵將修改AndroidManifest.xml檔。這裏添加<service.../>標籤來包含我們的服務:
<?xml version="1.0" encoding="utf-8"?>
<manifest xmlns:android="http://schemas.android.com/apk/res/android"
    package="com.zaixian.androidservices"
    android:versionCode="1"
    android:versionName="1.0">

    <uses-sdk
        android:minSdkVersion="13"
        android:targetSdkVersion="22" />

    <application
        android:icon="@drawable/ic_launcher"
        android:label="@string/app_name"
        android:theme="@style/AppTheme" >

        <activity
            android:name=".MainActivity"
            android:label="@string/title_activity_main" >

            <intent-filter>
                <action android:name="android.intent.action.MAIN" />
                <category android:name="android.intent.category.LAUNCHER"/>
            </intent-filter>

        </activity>

        <service android:name=".MyService" />

    </application>

</manifest>
以下是res/layout/activity_main.xml檔的內容,包含兩個按鈕:
<RelativeLayout xmlns:android="http://schemas.android.com/apk/res/android"
    xmlns:tools="http://schemas.android.com/tools" android:layout_width="match_parent"
    android:layout_height="match_parent" android:paddingLeft="@dimen/activity_horizontal_margin"
    android:paddingRight="@dimen/activity_horizontal_margin"
    android:paddingTop="@dimen/activity_vertical_margin"
    android:paddingBottom="@dimen/activity_vertical_margin" tools:context=".MainActivity">

    <TextView
        android:id="@+id/textView1"
        android:layout_width="wrap_content"
        android:layout_height="wrap_content"
        android:text="Android 服務實例"
        android:layout_alignParentTop="true"
        android:layout_centerHorizontal="true"
        android:textSize="30dp" />

    <TextView
        android:id="@+id/textView2"
        android:layout_width="wrap_content"
        android:layout_height="wrap_content"
        android:text="www.xuhuhu.com"
        android:textColor="#ff87ff09"
        android:textSize="30dp"
        android:layout_above="@+id/imageButton"
        android:layout_centerHorizontal="true"
        android:layout_marginBottom="40dp" />

    <ImageButton
        android:layout_width="wrap_content"
        android:layout_height="wrap_content"
        android:id="@+id/imageButton"
        android:src="@drawable/ic_launcher"
        android:layout_centerVertical="true"
        android:layout_centerHorizontal="true" />

    <Button
        android:layout_width="wrap_content"
        android:layout_height="wrap_content"
        android:id="@+id/button2"
        android:text="啟動服務"
        android:onClick="startService"
        android:layout_below="@+id/imageButton"
        android:layout_centerHorizontal="true" />

    <Button
        android:layout_width="wrap_content"
        android:layout_height="wrap_content"
        android:text="停止服務"
        android:id="@+id/button"
        android:onClick="stopService"
        android:layout_below="@+id/button2"
        android:layout_alignLeft="@+id/button2"
        android:layout_alignStart="@+id/button2"
        android:layout_alignRight="@+id/button2"
        android:layout_alignEnd="@+id/button2" />

</RelativeLayout>
下麵是res/values/strings.xml的內容,來定義兩個新的常量:
<?xml version="1.0" encoding="utf-8"?>
<resources>

    <string name="app_name">Android Services</string>
    <string name="title_activity_main">MainActivity</string>
    <string name="menu_settings">Settings</string>
    <string name="action_settings">Settings</string>

</resources>
讓我們運行剛剛修改的My Application應用程式。我假設你已經在安裝環境時創建了AVD。打開你的專案中的活動檔,點擊工具欄中的 圖示來在Android Studio中運行應用程式。Android Studio在AVD上安裝應用程式並啟動它。如果一切順利,將在模擬器窗口上顯示如下:
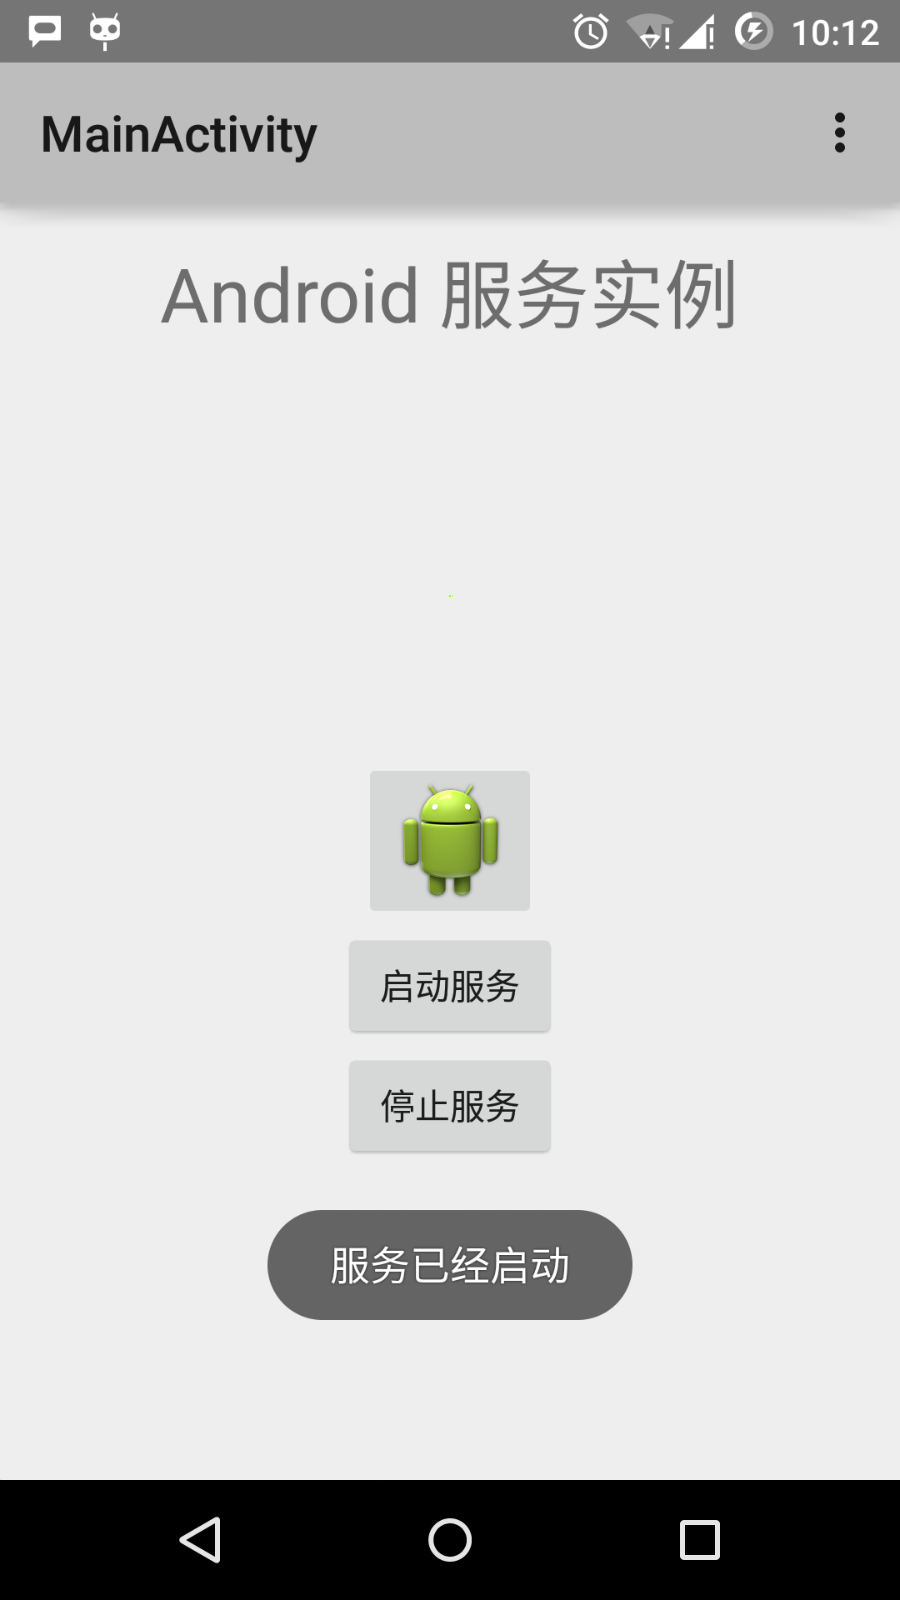
現在點擊"啟動服務"按鈕來啟動服務,這將執行我們編寫的onStartCommand()方法,一條"服務已經啟動"的消息在模擬器的底部出現,如下:

點擊底部的"停止服務"按鈕,可以停止服務。