-
获取所有的依赖库(很多)。
-
注册 Spring 的 ContextLoaderListener 来整合 Struts2 和 Spring。
-
使用 Spring 的 LocalSessionFactoryBean 来集成 Spring 和 Hibernate。
-
完成所有连接。
Struts 2 <-- (ContextLoaderListener) --> Spring <-- (LocalSessionFactoryBean) --> Hibernate
这将要创建一个客户页面,以添加客户和列表的自定义函数。前端使用Struts2显示,Spring作为依赖注入引擎,而 Hibernate 用来执行数据库操作。让我们开始...
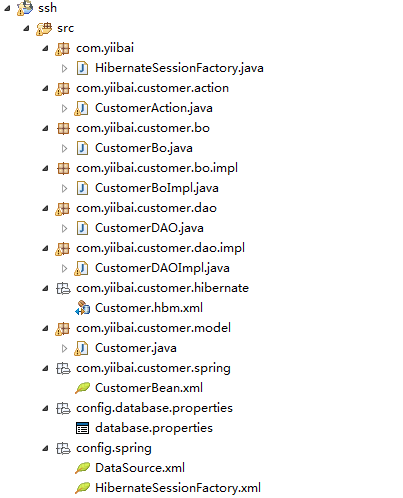
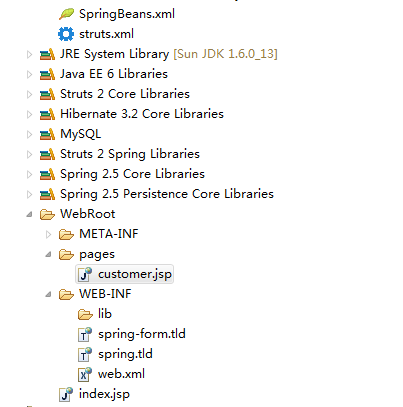
1. 工程文件夹结构
在本章中,我们创建一个 ssh 的web工程,工程的目录结构如下图所示:
2. MySQL表结构结构
DROP TABLE IF EXISTS `zaixian`.`customer`;
CREATE TABLE  `zaixian`.`customer` (
  `CUSTOMER_ID` bigint(20) unsigned NOT NULL AUTO_INCREMENT,
  `NAME` varchar(45) NOT NULL,
  `ADDRESS` varchar(255) NOT NULL,
  `CREATED_DATE` datetime NOT NULL,
  PRIMARY KEY (`CUSTOMER_ID`)
) ENGINE=InnoDB AUTO_INCREMENT=17 DEFAULT CHARSET=utf8;
3. Hibernate相关配置
Customer.java – 创建客户表对应的一个类。
package com.zaixian.customer.model;

import java.util.Date;

public class Customer implements java.io.Serializable {

	private Long customerId;
	private String name;
	private String address;
	private Date createdDate;

	//getter and setter methods
}
Customer.hbm.xml – Hibernate的客户映射文件。
<?xml version="1.0"?>
<!DOCTYPE hibernate-mapping PUBLIC "-//Hibernate/Hibernate Mapping DTD 3.0//EN"
"http://hibernate.sourceforge.net/hibernate-mapping-3.0.dtd">
<!-- Generated 20 Julai 2010 11:40:18 AM by Hibernate Tools 3.2.5.Beta -->
<hibernate-mapping>
    <class name="com.zaixian.customer.model.Customer"
		table="customer" catalog="zaixian">
        <id name="customerId" type="java.lang.Long">
            <column name="customer_id" />
            <generator class="identity" />
        </id>
        <property name="name" type="string">
            <column name="name" length="45" not-null="true" />
        </property>
        <property name="address" type="string">
            <column name="address" not-null="true" />
        </property>
        <property name="createdDate" type="timestamp">
            <column name="create_date" length="19" not-null="true" />
        </property>
    </class>
</hibernate-mapping>
5. Struts2相关
实现了 Bo 和 DAO 设计模式。所有Bo和DAO将由Spring Spring bean配置文件注入。在DAO中,让它扩展Spring的HibernateDaoSupport来集成 Spring 和 Hibernate。
CustomerBo.java
package com.zaixian.customer.bo;

import java.util.List;
import com.zaixian.customer.model.Customer;

public interface CustomerBo{

	void addCustomer(Customer customer);
	List<Customer> listCustomer();

}
CustomerBoImpl.java
package com.zaixian.customer.bo.impl;

import java.util.List;
import com.zaixian.customer.bo.CustomerBo;
import com.zaixian.customer.dao.CustomerDAO;
import com.zaixian.customer.model.Customer;

public class CustomerBoImpl implements CustomerBo{

	CustomerDAO customerDAO;
	//DI via Spring
	public void setCustomerDAO(CustomerDAO customerDAO) {
		this.customerDAO = customerDAO;
	}

	//call DAO to save customer
	public void addCustomer(Customer customer){
		customerDAO.addCustomer(customer);
	}

	//call DAO to return customers
	public List<Customer> listCustomer(){
		return customerDAO.listCustomer();
	}
}
CustomerDAO.java
package com.zaixian.customer.dao;

import java.util.List;
import com.zaixian.customer.model.Customer;

public interface CustomerDAO{

	void addCustomer(Customer customer);
	List<Customer> listCustomer();

}
CustomerDAOImpl.java
package com.zaixian.customer.dao.impl;

import java.util.List;
import org.springframework.orm.hibernate3.support.HibernateDaoSupport;
import com.zaixian.customer.dao.CustomerDAO;
import com.zaixian.customer.model.Customer;

public class CustomerDAOImpl extends HibernateDaoSupport
    implements CustomerDAO{

	//add the customer
	public void addCustomer(Customer customer){
		getHibernateTemplate().save(customer);
	}

	//return all the customers in list
	public List<Customer> listCustomer(){
		return getHibernateTemplate().find("from Customer");
	}

}
CustomerAction.java – Struts2 的动作不再需要扩展ActionSupport,它将由 Spring 来处理。
package com.zaixian.customer.action;

import java.util.ArrayList;
import java.util.Date;
import java.util.List;

import com.zaixian.customer.bo.CustomerBo;
import com.zaixian.customer.model.Customer;
import com.opensymphony.xwork2.ModelDriven;

public class CustomerAction implements ModelDriven{

	Customer customer = new Customer();
	List<Customer> customerList = new ArrayList<Customer>();

	CustomerBo customerBo;
	//DI via Spring
	public void setCustomerBo(CustomerBo customerBo) {
		this.customerBo = customerBo;
	}

	public Object getModel() {
		return customer;
	}

	public List<Customer> getCustomerList() {
		return customerList;
	}

	public void setCustomerList(List<Customer> customerList) {
		this.customerList = customerList;
	}

	//save customer
	public String addCustomer() throws Exception{

		//save it
		customer.setCreatedDate(new Date());
		customerBo.addCustomer(customer);

		//reload the customer list
		customerList = null;
		customerList = customerBo.listCustomer();

		return "success";

	}

	//list all customers
	public String listCustomer() throws Exception{

		customerList = customerBo.listCustomer();

		return "success";

	}

}
6. Spring相关配置
CustomerBean.xml – 声明 Spring 的 bean:Action, BO 和 DAO.
<?xml version="1.0" encoding="UTF-8"?>
<beans xmlns="http://www.springframework.org/schema/beans"
	xmlns:xsi="http://www.w3.org/2001/XMLSchema-instance"
	xsi:schemaLocation="http://www.springframework.org/schema/beans
	http://www.springframework.org/schema/beans/spring-beans-2.5.xsd">

 	<bean id="customerAction" class="com.zaixian.customer.action.CustomerAction">
		<property name="customerBo" ref="customerBo" />
	</bean>

	<bean id="customerBo" class="com.zaixian.customer.bo.impl.CustomerBoImpl" >
		<property name="customerDAO" ref="customerDAO" />
	</bean>

   	<bean id="customerDAO" class="com.zaixian.customer.dao.impl.CustomerDAOImpl" >
		<property name="sessionFactory" ref="sessionFactory" />
	</bean>

</beans>
database.properties – 声明数据库详细信息
jdbc.driverClassName=com.mysql.jdbc.Driver
jdbc.url=jdbc:mysql://localhost:3306/zaixian
jdbc.username=root
jdbc.password=password
DataSource.xml – 创建一个数据库源的Bean
<beans xmlns="http://www.springframework.org/schema/beans"
xmlns:xsi="http://www.w3.org/2001/XMLSchema-instance"
xsi:schemaLocation="http://www.springframework.org/schema/beans
http://www.springframework.org/schema/beans/spring-beans-2.5.xsd">

 <bean
   class="org.springframework.beans.factory.config.PropertyPlaceholderConfigurer">
   <property name="location">
     <value>WEB-INF/classes/config/database/properties/database.properties</value>
   </property>
</bean>

  <bean id="dataSource"
         class="org.springframework.jdbc.datasource.DriverManagerDataSource">
	<property name="driverClassName" value="${jdbc.driverClassName}" />
	<property name="url" value="${jdbc.url}" />
	<property name="username" value="${jdbc.username}" />
	<property name="password" value="${jdbc.password}" />
  </bean>

</beans>
HibernateSessionFactory.xml – 创建一个SessionFactory Bean来集成Spring和Hibernate。
<?xml version="1.0" encoding="UTF-8"?>
<beans xmlns="http://www.springframework.org/schema/beans"
xmlns:xsi="http://www.w3.org/2001/XMLSchema-instance"
xsi:schemaLocation="http://www.springframework.org/schema/beans
http://www.springframework.org/schema/beans/spring-beans-2.5.xsd">

<!-- Hibernate session factory -->
<bean id="sessionFactory"
    class="org.springframework.orm.hibernate3.LocalSessionFactoryBean">

    <property name="dataSource">
      <ref bean="dataSource"/>
    </property>

    <property name="hibernateProperties">
       <props>
         <prop key="hibernate.dialect">org.hibernate.dialect.MySQLDialect</prop>
         <prop key="hibernate.show_sql">true</prop>
       </props>
    </property>

    <property name="mappingResources">
		<list>
          <value>com/zaixian/customer/hibernate/Customer.hbm.xml</value>
		</list>
    </property>

</bean>
</beans>
SpringBeans.xml – 创建一个核心 Spring 的 bean 配置文件,作为中央的 bean 管理层。
<beans xmlns="http://www.springframework.org/schema/beans"
xmlns:xsi="http://www.w3.org/2001/XMLSchema-instance"
xsi:schemaLocation="http://www.springframework.org/schema/beans
http://www.springframework.org/schema/beans/spring-beans-2.5.xsd">

	<!-- Database Configuration -->
	<import resource="config/spring/DataSource.xml"/>
	<import resource="config/spring/HibernateSessionFactory.xml"/>

	<!-- Beans Declaration -->
	<import resource="com/zaixian/customer/spring/CustomerBean.xml"/>

</beans>
7. JSP 页面
customer.jsp
<%@ taglib prefix="s" uri="/struts-tags" %>
<html>
<head>
</head>

<body>
<h1>Struts 2 + Spring + Hibernate integration example</h1>

<h2>Add Customer</h2>
<s:form action="addCustomerAction" >
  <s:textfield name="name" label="Name" value="" />
  <s:textarea name="address" label="Address" value="" cols="50" rows="5" />
  <s:submit />
</s:form>

<h2>All Customers</h2>

<s:if test="customerList.size() > 0">
<table border="1px" cellpadding="8px">
	<tr>
		<th>Customer Id</th>
		<th>Name</th>
		<th>Address</th>
		<th>Created Date</th>
	</tr>
	<s:iterator value="customerList" status="userStatus">
		<tr>
			<td><s:property value="customerId" /></td>
			<td><s:property value="name" /></td>
			<td><s:property value="address" /></td>
			<td><s:date name="createdDate" format="dd/MM/yyyy" /></td>
		</tr>
	</s:iterator>
</table>
</s:if>
<br/>
<br/>

</body>
</html>
8. struts.xml
<?xml version="1.0" encoding="UTF-8" ?>
<!DOCTYPE struts PUBLIC
"-//Apache Software Foundation//DTD Struts Configuration 2.0//EN"
"http://struts.apache.org/dtds/struts-2.0.dtd">

<struts>
 	<constant name="struts.devMode" value="true" />

	<package name="default" namespace="/" extends="struts-default">

		<action name="addCustomerAction"
			class="customerAction" method="addCustomer" >
		    <result name="success">pages/customer.jsp</result>
		</action>

		<action name="listCustomerAction"
			class="customerAction" method="listCustomer" >
		    <result name="success">pages/customer.jsp</result>
		</action>

	</package>

</struts>
9. Struts 2 + Spring
要集成Struts2和Spring,只需注册ContextLoaderListener监听器类,定义一个“contextConfigLocation”参数要求Spring容器来解析“SpringBeans.xml”,而不使用默认的“applicationContext.xml”。
web.xml
<!DOCTYPE web-app PUBLIC
 "-//Sun Microsystems, Inc.//DTD Web Application 2.3//EN"
 "http://java.sun.com/dtd/web-app_2_3.dtd" >

<web-app>
  <display-name>Struts 2 Web Application</display-name>

  <filter>
	<filter-name>struts2</filter-name>
	<filter-class>
	  org.apache.struts2.dispatcher.ng.filter.StrutsPrepareAndExecuteFilter
	</filter-class>
  </filter>

  <filter-mapping>
	<filter-name>struts2</filter-name>
	<url-pattern>/*</url-pattern>
  </filter-mapping>

  <context-param>
	<param-name>contextConfigLocation</param-name>
	<param-value>/WEB-INF/classes/SpringBeans.xml</param-value>
  </context-param>

  <listener>
    <listener-class>
      org.springframework.web.context.ContextLoaderListener
    </listener-class>
  </listener>

</web-app>
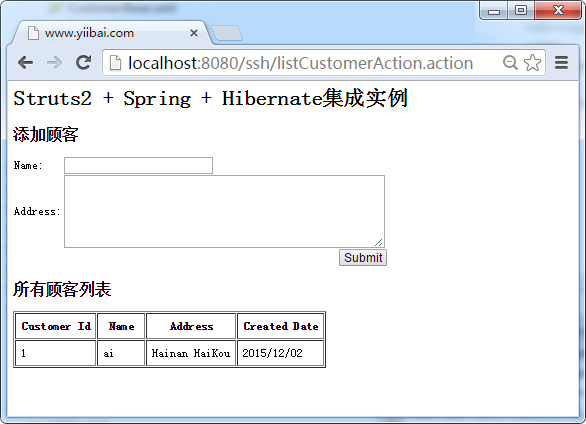
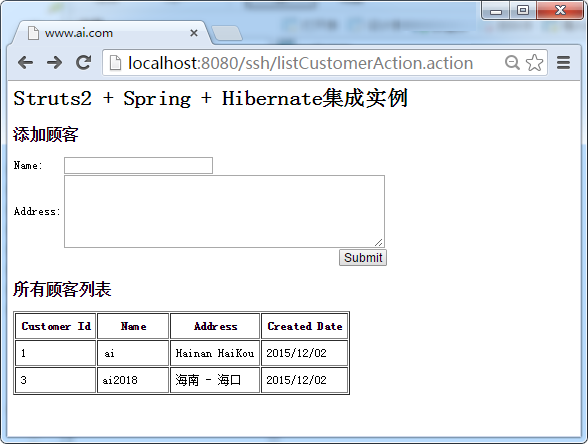
10. 运行实例
在浏览器中打开网址 : http://localhost:8080/ssh/listCustomerAction.action